World Cardmaking Day-Blackberry Beauty Card

Hello! Today is World Cardmaking Day! This event was started by the now defunct Card Maker magazine as a way to promote cardmaking and stamping and as a way to jumpstart cardmaking for the holiday season. This event always occurs on the first Saturday of October. I wasn’t able to plan my own event this year, however, I am sharing a card we made in my quarterly club last week. Take some time today to make a card and send a card to spread sunshine and let someone know that you care about them and are thinking of them. To see what others are doing and see some projects that are being posted around the internet, enter hashtag #wcmd2021.

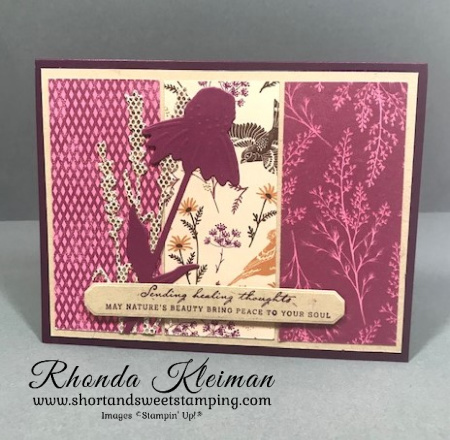
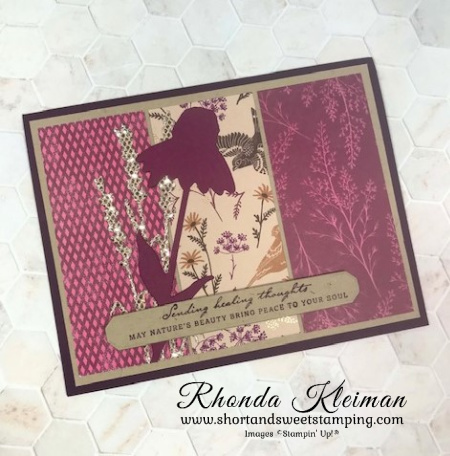
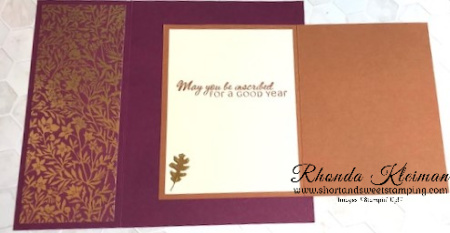
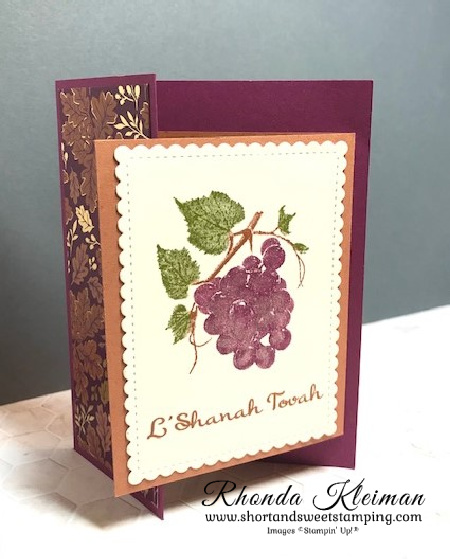
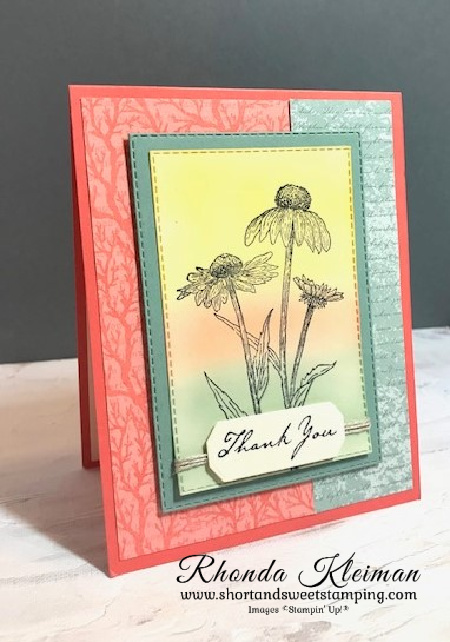
This card features products from the Blackberry Beauty and Harvest Beauty suites and is a quick and easy card to make. Here is how to make the card.

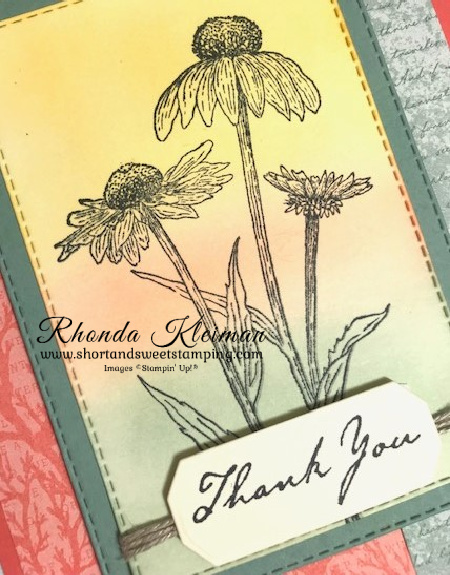
  • Card base – Cut piece of Blackberry Bliss cardstock at 5 1/2″ x 8 1/2″, score at 4 1/4″, fold and crease with a bone folder.
  • Cut piece of Crumb Cardstock at 4″ x 5 1/4″.
  • Cut three different pieces of Blackberry Beauty Designer Series Paper into 1 5/8″ x 4″ strips. Adhere to Crumb Cake piece.
  • Using the Harvest Dies, run the coneflower through the Stampin’ Cut & Emboss Machine with scrap piece of Rich Razzleberry cardstock. Run the stalks through the machine with the Be Dazzling Specialty Paper. This paper is now retired, as it was one of the free Sale-A-Bration items in the promotion that has now ended. Adhere both pieces to the DSP piece with liquid glue. Trim the ends of the stems down to the edge of the bottom of the piece.
  • Adhere piece to card base.
  • Cut a piece of Crumb Cake cardstock at 1″ x 4 1/2″. Stamp greeting from the Beauty of Tomorrow stamp set with Blackberry Bliss ink. Run through die cutting machine with the long label die from the Harvest Dies. Adhere to card front with Stampin’ Dimensionals.
  • Cut piece of Very Vanilla cardstock at 4″ x 5 1/4″. Stamp the bird with Blackberry Bliss ink in one of the corners of the piece and adhere to inside of card.

Thanks for stopping by today!

Place an online order between $50 and $149 and use this host code for October. You will receive a free gift from me the following month.  If your order is $150 or more DO NOT use the host code. You will qualify for Stampin’ Rewards.

Product List
Harvest Dies
[156504]
$38.00
Paper Snips
[103579]
$10.00

Three Easy Cards with Sale-A-Bration Designer Series Paper

Hello! September seems to be flying by, which means that the current Sale-A-Bration promotion will be coming to an end on September 30th! You still have one week to earn free products with every $50 or $100 purchase. Today I have three cards for you that feature the Designer Series Papers you can earn with a $50 purchase. As a Stampin’ Up! demonstrator I receive Succeed Weekly in my email box each week and it is filled with business and creative inspiration. Several weeks ago they featured three cards made with a very simple layout, using the DSP, as shown here.

I decided to create my own cards, as shown here.

This layout makes quick and easy cards, with minimal stamping and no need for many embellishments, so it would be great for beginner stampers and crafters. It is also a great way to use up all those packages of DSP sitting on your shelf that you’ve been afraid to cut into! Cut Basic White Thick cardstock at 4 1/4″ x 11″ for the card bases or select a cardstock color that coordinates with the DSP.

This card uses the Peaceful Prints DSP. Get a jump on making some Christmas cards now with this beautiful paper. The coordinating colors are Basic Black, Cherry Cobbler, Garden Green, Real Red and Sahara Sand. I used the Perfectly Plaid stamp set to stamp the tree in Garden Green ink and cut out the circle with one of the Layering Circles Dies. You can also use a circle punch. The Joy greeting from the Whimsical Trees stamp set was stamped in Real Red ink on a scrap piece of Basic White cardstock. I used the black & white gingham ribbon in the July-December 2021 Mini Catalog as an accent and adhered it with a piece of Tear & Tape Adhesive.

This card uses the adorable Penguin Playmates DSP. This paper coordinates with the Penguin Place bundle in the July-December 2021 Mini Catalog, however, you don’t need the bundle to create great cards, as the paper speaks for itself! The coordinating colors are Balmy Blue, Basic Black, Calypso Coral, Fresh Freesia, Just Jade, Misty Moonlight and Soft Sea Foam. I fussy cut the penguin from one of the sheets of paper, punched a circle from a contrasting piece of DSP and adhered the penguin to it. I used one of the greetings from the Sweet Ice Cream stamp set, stamped it with Tuxedo Memento Black ink on a scrap piece of Basic White cardstock and flagged one of the ends.

This last card uses the Beautifully Penned DSP, which coordinates with the Hand-Penned Petals Bundle in the 2021-2022 Annual Catalog, although this paper works beautifully with many other stamp sets. Who doesn’t love black and white paper – it goes with everything and you can also color it with markers, Stampin’ Blends or with ink pads and blending brushes. This set of papers includes 4 sheets each of 3 double-sided designs. I cut a circle from the paper and colored the flowers with Pale Papaya and Soft Sea Foam Stampin’ blends. The greeting was stamped on a scrap piece of Basic White cardstock. I used the hello greeting from the Timeless Tulips stamp set. I cut a 1/4″ strip of Pale Papaya cardstock to use as an accent between the two pieces of DSP.

Thanks for stopping by today!

There is only one week left to join Stampin’ Up! and get this great Sale-A-Bration deal! You get to select $125 worth of products for only $99 and will also get a FREE bundle from the Holiday Catalog! You will also earn free Sale-A-Bration products! Everything ships for free. I’d love to have you join my team. Become a happy discount shopper or build a business – the choice is yours! Click here for the benefits of joining Stampin’ Up!

Here is a list of bundles you can select from.

Place an online order between $50 and $149 and use this host code for September. You will receive a free gift from me the following month.  If your order is $150 or more DO NOT use the host code. You will qualify for Stampin’ Rewards.

Product List
Paper Snips
[103579]
$10.00

Shaded Summer Thank You-Kylie’s Training Blog Hop

Hello! Welcome to Kylie Bertucci’s Demonstrator Training Blog Hop for September. This is the last hop for the 2020-2021 year. I’m part of a group of Stampin’ Up! demonstrators from around the world that participate in Kylie’s program for building our businesses. The theme for this year is thank you cards that we make as a way to show appreciation to our customers and teams. Please be sure to click on the names in the list at the end of this post to hop around and view the beautiful projects created by so many talented stampers.

Today’s card features the Shaded Summer Stamp set in the annual catalog, along with the Summer Shadows Dies that you can earn for free with a $100 purchase during Sale-a-Bration through the end of September. The Beautifully Penned Designer Series Paper is also a Sale-a-Bration item that you can earn with a $50 purchase. I decided to go with bright colors and used Magenta Madness as one of them. As I was going through all of my cardstock recently to see what needed to be replenished, I saw that I barely made a dent with this one. As much as I love bright colors, this is way bright even for me!

Here is how I made the card.

  • Card base – cut a piece of Bermuda Bay cardstock at 5 1/2″ x 8 1/2″, score at 4 1/4″, fold and crease with a bone folder.
  • Cut two pieces of Magenta Madness cardstock, one at 4″ x4″ and one at 3 1/8″ x 3 7/8″.
  • Cut piece of Beautifully Penned DSP at 3 7/8″ x 3 7/8″ and adhere to the 4″ square piece of Magenta Madness cardstock. Tie a bow around this piece with the black & white gingham ribbon. Adhere piece to card base.
  • Cut a piece of Basic White cardstock at 3″ x 3 3/4″. Stamp thank you from the Shaded Summer stamp set with Tuxedo Black Memento ink in upper left corner.
  • Stamp the small floral image from the stamp set with the Memento ink onto a piece of Basic White cardstock. Color the flowers with the light and dark Magenta Madness Stampin’ Blends. Color the leaves with the light and dark Granny Apple Green Stampin’ Blends. Run through die cutting machine with the coordinating die from the Summer Shadows dies.
  • Back two scrap pieces of Bermuda Bay cardstock with an adhesive sheet cut to size. Run two different flowers through die cutting machine. Die cut two of the small solid leaves from scrap pieces of Granny Apple Green cardstock. Pull adhesive sheet backings off the flowers and adhere the leaf stems to the backs of each. Apply a few small dots of liquid glue to the leaves and adhere the flowers to the greeting piece.
  • Adhere the floral image over the die cut flowers with Stampin’ Dimensionals. Adhere piece to te 3 1/8″ x 3 7/8″ piece of Magenta Madness cardstock. Adhere piece to card front, overlapping the square piece.
  • For the inside of the card, cut a piece of Basic White cardstock at 4″ x 5 1/4″. Stamp the “so grateful” greeting from the Ornate Thanks stamp set with Magenta Madness ink. Stamp the sprig from the Shaded Summer stamp set with Granny Apple Green ink in lower left corner. Adhere to card.

Thanks for stopping by today!


(Linkup closed)

Join Stampin’ Up! now through September 30th. You get to select $125 worth of products for only $99 and will also get a FREE bundle from the Holiday Catalog! Everything ships for free. I’d love to have you join my team. Become a happy discount shopper or build a business – the choice is yours! Click here for the benefits of joining Stampin’ Up!

Here is a list of bundles you can select from.

Place an online order between $50 and $149 and use this host code for September. You will receive a free gift from me the following month.  If your order is $150 or more DO NOT use the host code. You will qualify for Stampin’ Rewards.

Product List
Paper Snips
[103579]
$10.00

Slice of Happiness Rosh Hashanah Card

Hello! I made today’s card to send to my friends and relatives for the Jewish New Year, Rosh Hashanah. Stampin’ Up! hasn’t had a Jewish holiday stamp set for many years so every year I take on the challenge of using SU products to create my holiday cards. It is amazing what you can come up with! I can usually adapt one of our packages of Designer Series Papers from the holiday catalog, or sometimes there are stamp sets that contain images that are symbols of the Jewish New Year. When I saw the gorgeous Blackberry Beauty Specialty Designer Series Paper in the July-December 2021 Mini Catalog, the rich purples made me think of grapes, which is one of the symbols. I thought immediately of the retired stamp set, Slice of Life from the 2019-2020 Annual Catalog, because one of the images is grapes. I used this stamp set to make my holiday card in 2019 and used the pomegranate image on that card. You can see it in this blog post. I used a set of Jewish holiday greetings from a retired Papertrey Ink stamp set. I also used one of my favorite fun-folds, which is a great way to showcase a stamped image.

Here is how I made the card.

  • Card base – cut a piece of Rich Razzleberry cardstock at 5 1/2″ x 6 1/2″. Score at 2 1/4″. Fold and crease sharply with a bone folder.
  • Cut two strips of Blackberry Beauty DSP at 2″ x 5 1/4″. I used two different papers, one for the front fold and one for the inside fold. Adhere to both sides of the fold.
  • Smaller card base – cut a piece of Cinnamon Cider cardstock at 6 1/2″ x 4 1/4″ and score at 3 1/4″. Fold and crease sharply with a bone folder. Cut a piece of Very Vanilla cardstsock at 3″ x 4″, stamp greeting with Cinnamon Cider ink and adhere to the inside left side of the card base. Cut a scrap piece of Gold Foil and run it through your die cutting machine with one of the small leaf dies from the Beautiful Leaves Dies. Adhere with small dots of liquid glue to bottom left of the greeting piece.
  • Cut piece of Very Vanilla cardstock at 3 1/2″ x 4 1/2″ and run through your die cutting machine with the largest rectangle from the Stitched so Sweetly dies.
  • Use the direct-to-rubber coloring technique to color the grape image with Stampin’ Write Markers. I used Old Olive for the leaves, Cinnamon Cider for the branches and Rich Razzleberry for the grapes. Stamp onto the Very Vanilla cardstock, leaving room to stamp the greeting at the bottom. Stamp the greeting with Cinnamon Cider ink. Add some sparkle to the grapes with Wink of Stella.
  • Adhere the piece to the front of the Cinnamon Cider card base. Note that the folded base will open from left to right so make sure the opening is in the right direction before you adhere the stamped image!
  • Adhere the smaller card to the Rich Razzleberry card base so that the front of the smaller card overlaps the front fold of the larger card.

Thanks for stopping by today!

Place an online order between $50 and $149 and use this host code for September. You will receive a free gift from me the following month.  If your order is $150 or more DO NOT use the host code. You will qualify for Stampin’ Rewards.

Christmas Kit Now Avaliable!

Christmas Whimsy is an adorably festive card kit with a modern design! In this all-inclusive kit, the hard work is done for you! All pieces are printed, die cut, and ready for you to craft. The simple steps of this kit are perfect for beginner crafters and kids, too! Grab a kit or two and gather around for a simple Christmas activity that everyone will enjoy. The kit contains everything you need to create eight elf-centric Christmas cards including printed card bases, die cuts, embellishments, an exclusive stamp set, a Night of Navy Classic Stampin’ Spot, and more! Create two each of four designs, finished size of cards is 5 1/2″ x 4 1/4″. Coordinating colors: Balmy Blue, Basic Gray, Crumb Cake, Evening Evergreen, Gray Granite, Misty Moonlight, Poppy Parade, Real Red, So Saffron, Soft Succulent, Soft Suede. You can order this kit, Item # 158155, in my online store. Cost of the kit is $19.00.

Product List
Paper Snips
[103579]
$10.00

Forever Blossoms Wedding Card

Hello! My cousin’s daughter was married two weeks ago so I needed to make a wedding card. It’s been a few years since I’ve had to make a wedding card! All of the wedding stamp sets I have are retired so I turned to Pinterest for some inspiration and saw a number of ideas for cards that use the Forever Blossoms stamp set. I own this beautiful stamp set and haven’t used it recently so decided to give it a little love.

Here’s how I made the card.

  • Card base – Cut a piece of Thick Basic White cardstock at 5 1/2″ x 8 1/2″, score at 4 1/4″, fold and crease with a bone folder.
  • Cut a piece of Pool Party cardstock at 4 1/8″ x 5 3/8″ and a piece of coordinating Designer Series Paper at 4″ x 5 1/4″. I used the Parisian Blossoms Specialty Designer Series Paper, which is now retired. It was part of the Parisian Blossoms Suite in the January-June 2020 Mini Catalog. Adhere the two pieces together. Cut a 24″ length of Pool Party Sheer Ribbon and tie in a bow around the piece. Adhere piece to card front.
  • Run a 4″ x 5″ piece of Pool Party cardstock through your die cutting machine with the next-to-largest die in the Ornate Layers die set. Stamp the “Always and Forever” greeting from the Forever Blossoms stamp set with Tuxedo Black Memento ink in bottom right corner.
  • Stamp the large floral image from the stamp set with Memento ink on piece of Basic White cardstock. Color the flowers with the light and dark Pool Party Stampin’ Blends and color the leaves with the light and dark Old Olive Stampin’ Blends. Run through your die cutting machine with the coordinating die from the Cherry Blossoms Dies.
  • Adhere the Pool Party Ornate Layer piece to card front. Adhere the floral piece over the Ornate Layer piece with Stampin’ Dimensionals.
  • Add a bit of bling to accent the floral piece by adhering three Night of Navy Blue Adhesive-Backed Gems.
  • For the inside of the card I stamped another greeting from the Forever Blossoms stamp set with Memento ink. I also stamped a blossom in the lower left corner and colored it in with the Pool Party Stampin’ Blends.

Thanks for stopping by today!

Place an online order between $50 and $149 and use this host code for September. You will receive a free gift from me the following month.  If your order is $150 or more DO NOT use the host code. You will qualify for Stampin’ Rewards.

Join Stampin’ Up! now through September 30th. You get to select $125 worth of products for only $99 and will also get a FREE bundle from the Holiday Catalog! The kit ships for free. I’d love to have you join my team. Become a happy discount shopper or build a business – the choice is yours! Click here for the benefits of joining Stampin’ Up!

Here is a list of bundles you can select from.

Experience everything the autumn season has to offer with the Haunts & Harvest Paper Pumpkin Kit! This month’s kit includes enough supplies to create 12 treat boxes—4 each of 3 designs. That means you can take your pick of apple, pumpkins, or jack-o-lantern treat boxes! Plus, the Paper Pumpkin box is designed to easily transform into a vintage wheelbarrow for you to display your harvest! The kit contains enough supplies to create 12 treat packages—4 each of 3 designs. The all-inclusive kit includes printed die-cut boxes, die-cut sheets, adhesive, and more! Finished treat box size: 2-1/2″ x 2″ (6.4 x 5.1 cm). Coordinating colors are Basic Black, Pale Papaya, Poppy Parade, Pumpkin Pie, Soft Succulent. Subscribe now through September10th. The kit will arrive in your mailbox around the 20th of the month. For further information and to subscribe, click here to visit my Paper Pumpkin website.

Product List
Paper Snips
[103579]
$10.00

Paper Pumpkin Hope Box

Hello! Today I’m featuring the August 2021 Paper Pumpkin Hope Box kit that was designed by Shelli Gardner, co-founder of Stampin’ Up! I purchase a few kits every year, and I must confess that I seldom get around to making most of them so I have quite a few boxes piled up! However, I loved this kit as soon as I opened the box so I intentionally set a few hours aside this weekend to make the projects, along with a few alternative projects. The items in the kit are pretty and include some of my favorite colors. Normally, the subscription period for Paper Pumpkin ends on the 10th of every month and then some of the kits are no longer available. This month is an exception. Due to a glitch in the ordering system, customers were unable to subscribe to Paper Pumpkin’s Shelli Hope Box between 31 July–5 August, so Stampin’ Up! is offering the Shelli Hope Box to all North American customers, regardless of subscription from 24 August–31 August! The kit can be purchased through the Paper Pumpkin Refills and Past Kits section of my online store until 11:59 PM (MT) 31 August. Click here to order the kit. Hope Box refills will continue to be available to subscribers only. After this limited offering, the full kit will only be available on the regular past kit schedule for subscribers only.

The kit is loaded with a stamp set, ink spot, cards, envelopes, embellishments, adhesives and a color brochure with photographs and instructions for how to put the projects together. You can make the projects as shown or create your own alternate designs.

The kit also contains everything you need to make a beautiful belly band for the box – so pretty!

These are the three cards I made following the instructions given.

These are three alternative cards I made with the supplies in the kit.

Here are separate pictures for each of the alternative cards. I chose some stamp sets with different greetings in my collection so that I could use the cards for other occasions. The DSP on the card with the hello friend tag is actually one of the envelopes that I cut up to use as a background.

Monthly pay as you go subscriptions are available for $22.00 per month including shipping by going to my Paper Pumpkin website. Prepaid three, six and twelve month subscriptions are also available by going to my online store.

Thanks for stopping by today!

Experience everything the autumn season has to offer with the Haunts & Harvest Paper Pumpkin Kit! This month’s kit includes enough supplies to create 12 treat boxes—4 each of 3 designs. That means you can take your pick of apple, pumpkins, or jack-o-lantern treat boxes! Plus, the Paper Pumpkin box is designed to easily transform into a vintage wheelbarrow for you to display your harvest! The kit contains enough supplies to create 12 treat packages—4 each of 3 designs. The all-inclusive kit includes printed die-cut boxes, die-cut sheets, adhesive, and more! Finished treat box size: 2-1/2″ x 2″ (6.4 x 5.1 cm). Coordinating colors are Basic Black, Pale Papaya, Poppy Parade, Pumpkin Pie, Soft Succulent. Subscribe now through September10th. The kit will arrive in your mailbox around the 20th of the month.

Place an online order between $50 and $149 and use this host code for August. You will receive a free gift from me the following month.  If your order is $150 or more DO NOT use the host code. You will qualify for Stampin’ Rewards.

Nature’s Harvest with Blending Brush Background

Hello! Today’s card features products from the beautiful new Harvest Meadow Suite in the July-December 2021 Mini Catalog. It uses the Nature’s Harvest stamp set, Harvest Dies and Harvest Meadow Designer Series Paper. This is another one of the cards we made in my class on using blending brushes last week. It is an easy card to put together.

Here is how I made the card.

  • Card base – cut a piece of Calypso Coral cardstock at 4 1/4″ x 11″, score at 5 1/2″, fold and crease with a bone folder.
  • Cut two pieces of paper from the Harvest Meadow DSP pack. Cut the Calypso Coral piece at 2 1/2″ x 5 1/4″ and the Soft Succulent piece at 1 1/2″ x 5 1/4″ and adhere both pieces to card front.
  • Cut a piece of Soft Succulent cardstock at 3 3/4″ x 4 3/4″ and run through your die cutting machine with the 3rd largest Stitched Rectangle die.
  • Cut a piece of Very Vanilla cardstock at 3″ x 4 1/2″ and run through your die cutting machine with the 4th largest Stitched Rectangle die.
  • To do the blended ink background, first apply Bumblebee ink with a blending brush to the top third of the piece. Gradually build the color to the depth you like, a little bit at a time. Next, apply Calypso Coral ink, making this section more narrow than the Bumblebee section. Since Calypso Coral is the main color on the card I wanted to use it as more of an accent in the background piece. Last, apply Soft Succulent ink to the bottom third of the piece, again building up the color to the depth you like.
  • Stamp the coneflower image from the Nature’s Harvest stamp set on the background piece with Tuxedo Black Memento ink.
  • Stamp greeting on scrap piece of Very Vanilla cardstock with the Memento ink and cut out with the small label die from the Harvest Dies set.
  • Wrap a piece of linen thread three times around bottom portion of the blended background piece and secure on the back with a piece of tape. Adhere the greeting over the wrapped thread with Mini Stampin’ Dimensionals.
  • Adhere blended background piece to the Soft Succulent cardstock piece.
  • Adhere the entire piece to the card front with Stampin’ Dimensionals.

Thanks for stopping by today!

Place an online order between $50 and $149 and use this host code for August. You will receive a free gift from me the following month.  If your order is $150 or more DO NOT use the host code. You will qualify for Stampin’ Rewards.

Join Stampin’ Up! now through September 30th. You get to select $125 worth of products for only $99 and will also get a FREE bundle from the Holiday Catalog! The kit ships for free. I’d love to have you join my team. Become a happy discount shopper or build a business – the choice is yours! Click here for the benefits of joining Stampin’ Up!

Here is a list of bundles you can select from.

Experience everything the autumn season has to offer with the Haunts & Harvest Paper Pumpkin Kit! This month’s kit includes enough supplies to create 12 treat boxes—4 each of 3 designs. That means you can take your pick of apple, pumpkins, or jack-o-lantern treat boxes! Plus, the Paper Pumpkin box is designed to easily transform into a vintage wheelbarrow for you to display your harvest! The kit contains enough supplies to create 12 treat packages—4 each of 3 designs. The all-inclusive kit includes printed die-cut boxes, die-cut sheets, adhesive, and more! Finished treat box size: 2-1/2″ x 2″ (6.4 x 5.1 cm). Coordinating colors are Basic Black, Pale Papaya, Poppy Parade, Pumpkin Pie, Soft Succulent. Subscribe now through September10th. The kit will arrive in your mailbox around the 20th of the month. For further information and to subscribe, click here to visit my Paper Pumpkin website.

Product List
Harvest Dies
[156504]
$38.00
Paper Snips
[103579]
$10.00