Thanks a Ton-Kylie’s Training Blog Hop

Hello! Welcome to Kylie Bertucci’s Demonstrator Training Blog Hop for August. I’m part of a group of Stampin’ Up! demonstrators from around the world that participate in Kylie’s program for building our businesses. The theme for this year is thank you cards that we make as a way to show appreciation to our customers and teams. Please be sure to click on the names in the list at the end of this post to hop around and view the beautiful projects created by so many talented stampers.

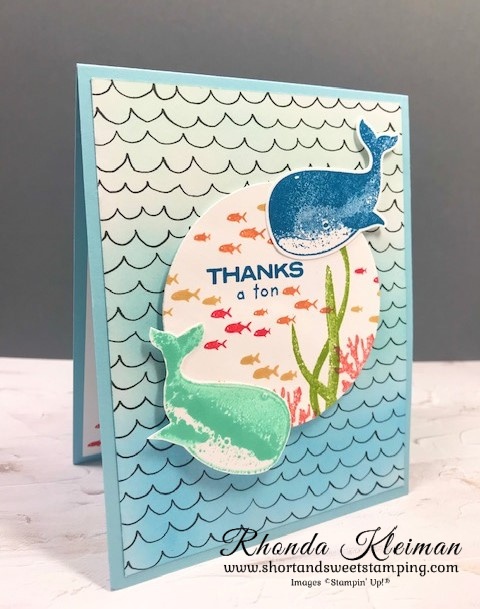
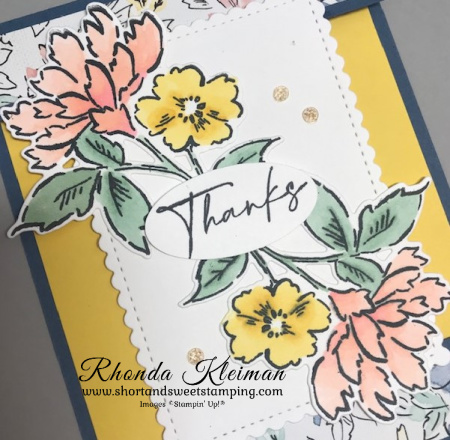
Today I’m sharing a card featuring the Whale Done stamp set and coordinating Whale Builder punch, as well as the Beautifully Penned Designer Series Paper that is one of the free items you can earn with a $50 purchase during Sale-A-Bration. When I looked at one of the designs in the paper pack it reminded me of waves, so I thought it would be fun to combine it with the Whale Done stamps. I altered the DSP by using the Blending Brushes with three different colors of ink to make it look like ocean water. It is one of the cards we will be making in a class I’m doing later this week on different techniques for using the Blending Brushes.

Here’s how I made the card.

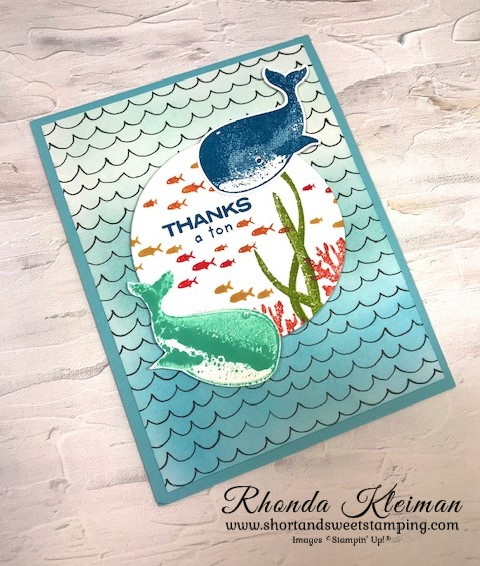
  • Card base – cut a piece of Balmy Blue cardstock at 4 1/4″ x 11″, score at 5 1/2″, fold and crease with a bone folder.
  • Cut a piece of the Beautifully Penned DSP at 4″ x 5 1/4″. Apply Coastal Cabana ink with Blending Brush to top third of the DSP. Keep this fairly light. For the middle part of the DSP apply Balmy Blue ink, going a little darker and blending it into the bottom edge of the Coastal Cabana. For the bottom third of the DSP apply Pacific Point ink, making this the darkest of the colors. Blend it into the bottom edge of the Balmy Blue. Continue going over each color until you achieve a good contrast.
  • To make the whales, stamp one whale image on a scrap piece of Basic White cardstock and punch with the Whale Builder punch. For the second whale, I wanted a reverse image so I stamped it onto the Silicone Craft Sheet with Coastal Cabana ink, placed a scrap piece of Basic White cardstock over the stamped image, pressed down, carefully lifted it up and voila! A whale going in the opposite direction! You will have to fussy cut this whale out since it is going in the opposite direction as the punch.
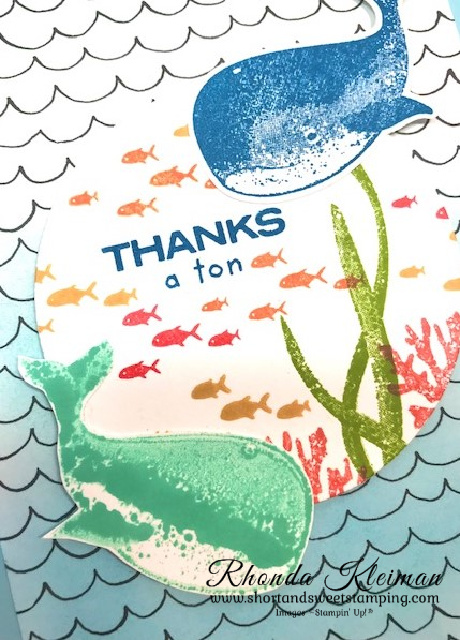
  • Cut a piece of Basic White cardstock at 3 1/2″ square and run through die cutting machine with the largest circle from the Layering Circles dies. Stamp the seaweed image with Granny Apple Green ink. Stamp the coral image twice with Calypso Coral ink. Stamp the greeting with Pacific Point ink. Stamp the fish images all around the circle with Poppy Parade, Bumblebee and Pumpkin Pie inks.
  • Adhere stamped circle with Stampin’ Dimensionals. Adhere the whales with liquid glue, positioning one at the top and one at the bottom of the circle.
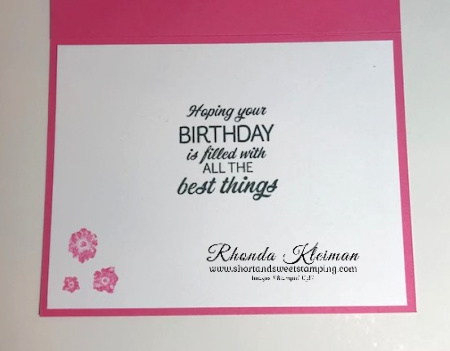
  • For the inside of the card, cut a piece of Basic White cardstock at 4″ x 5 1/4″. Stamp several of the fish images in the bottom left corner with Poppy Parade and Bumblebee ink. Adhere to card.

Thanks for stopping by today!

Place an online order between $50 and $149 and use this host code for August. You will receive a free gift from me the following month.  If your order is $150 or more DO NOT use the host code. You will qualify for Stampin’ Rewards.

Join Stampin’ Up! now through September 30th. You get to select $125 worth of products for only $99 and will also get a FREE bundle from the Holiday Catalog! The kit ships for free. I’d love to have you join my team. Become a happy discount shopper or build a business – the choice is yours! Click here for the benefits of joining Stampin’ Up!

Here is a list of bundles you can select from.

Product List
Paper Snips
[103579]
$10.00

Sweet Strawberry Thank You

Hello! Today I’m sharing the note card I made to send to customers that placed orders with me in July. It features the very popular Sweet Strawberry bundle and Pattern Party Designer Series Paper, which you can earn as a free Stampin’ Reward host item. I used the Stampin’ Up! Basic White Note cards and envelopes. I always have a few packages in my stash, as they come in handy when you need to make quick cards. You get 20 note cards and 20 envelopes for $7.00 so it is a great buy!

Here is how I made the cards,

  • Cut a piece of the striped paper from the Pattern Party DSP pack at 3 3/8″ x 4 7/8″ and adhere to card front.
  • The Sweet Strawberry stamp set is a two-step stamp set, so first, stamp two strawberry outlines and leaf outlines with Tuxedo Black Memento ink on scrap piece of Basic White cardstock. For the second step, use the coordinating fill stamps. Stamp the strawberries with Poppy Parade ink and stamp the leaves with Granny Apple Green ink.
  • Punch out the shapes with the Strawberry Builder Punch. Adhere the leaves to the tops of the strawberries with a few small dots of liquid glue.
  • For the thank you tag, I used the Tailor Made Tag dies and stamped the greetings with the Biggest Wish stamp set. First, stamp the block letter “thanks” with Poppy Parade ink. then stamp the script”thanks” over it with Memento ink. Run through your die cutting machine with the next-to-largest die with the rounded top.
  • To finish off the card, I used a piece of retired Blushing Bride bakers twine to make a slip knot through the tag opening. You can use any ribbon or twine you have on hand. Adhere the tag to the card front at an angle. Adhere the strawberries so that they are partially on the end of the tag and partially on the DSP, slightly overlapping them.

The DSP helped make this a colorful summertime card. Give this idea a try with other stamps and DSP when you need to make a quick and easy card.

Thanks for stopping by today!

Place an online order between $50 and $149 and use this host code for August. You will receive a free gift from me the following month.  If your order is $150 or more DO NOT use the host code. You will qualify for Stampin’ Rewards.

Join Stampin’ Up! now through September 30th. You get to select $125 worth of products for only $99 and will also get a FREE bundle from the Holiday Catalog! The kit ships for free. I’d love to have you join my team. Become a happy discount shopper or build a business – the choice is yours! Click here for the benefits of joining Stampin’ Up!

Here is a list of bundles you can select from.

Product List
Paper Snips
[103579]
$10.00

Color & Contour-Kylie’s International Blog Highlights

Hello! Today I’m participating in Kylie Bertucci’s International Blog Highlights. Readers get to vote on their top five favorites in the gallery and the top 10 winners will get to participate in an International Blog Hop later this month. The theme is “thank you”. This is one of the cards we made in one of my classes last month, where the projects featured the Hand-Penned Suite and the Color & Contours bundle. While the greeting doesn’t say “thank you,” I’m using this card to send out a special thanks to a friend.

Here’s how I made the card.

  • Card base – cut a piece of Blushing Bride cardstock at 4 1/4″ x 8 1/2″, score at 3″, fold and crease with a bone folder.
  • Smaller card base – cut a piece of Blushing Bride cardstock at 3″ x 8″, score at 4″, fold and crease with a bone folder.
  • Cut one piece of Hand-Penned Designer Series Paper at 4″ x 5 1/4″ and adhere to inside of card base, cut another piece at 2 3/4″ x 4″ and adhere to front fold of card base.
  • Using the third largest scalloped rectangle from the Scalloped Contours dies, cut a piece from Basic White cardstock.
  • Cut coordinating piece of DSP at 2 3/8″ x 3 7/8″ and adhere to front of smaller card base. Adhere the Basic White scalloped rectangle . Cut another piece of DSP at 1 7/8″ x 3 1/4″. Stamp hello greeting from Timeless Tropical stamp set with Tuxedo Black Memento Ink in lower right corner. Adhere to scalloped rectangle.
  • Stamp three flower outlines from the Color & Contour stamp set on scrap piece of Basic White cardstock with Memento ink. Use the fill stamp to stamp two of the flowers with Blushing Bride ink and one flower with Pale Papaya ink. Cut out with the coordinating die from the Scalloped Contoured dies. Adhere the two Blushing Bride flowers with liquid glue and adhere the Pale Papaya flower with a Stampin’ Dimensional.
  • Adhere the smaller card to the inside card base, making sure that the opening of the smaller card base is to the left and the fold is to the right.
  • Cut a piece of Basic White cardstock at 2 3/4″ x 3 3/4″. Stamp greeting from the Sunny Sentiments stamp set with Memento ink and adhere to inside of smaller card.
  • Adhere Petal Pink gems from the Elegant Faceted Gems to the center of each flower.

I’d be so appreciative if you would vote for my card! Click on the vote image below. Once you are in the gallery, click on the heart at the top right hand side of the picture as the hearts appear.

Thanks for stopping by today!

Delayed products are now available!

  • 156326 – Gingerbread & Peppermint Memories & More Card Pack
  • 156327 – Gingerbread & Peppermint Memories & More Cards & Envelopes
  • 156275 – Gingerbread & Peppermint Suite Collection
  • 156458 – Blackberry Beauty Specialty Designer Series Paper
  • 156278 – Blackberry Beauty Suite Collection

It’s Sale-A-Bration time! This is the first time ever that Stampin’ Up! is running a second SAB in the same year! Earn FREE products at the $50 or $100 level. There are no limits on how many items you can earn with every $50 you spend on products from the Annual Catalog or Holiday Mini Catalog. Among the products are some fun holiday Designer Series Papers for you to choose from. Click here to view the brochure.

Place an online order between $50 and $149 and use this host code for July. You will receive a free gift from me the following month.  If your order is $150 or more DO NOT use the host code. You will qualify for Stampin’ Rewards.

Product List
Paper Snips
[103579]
$10.00

Pansy Patch Envelope Fold Card

Hello! Today I’m sharing an envelope fold card that features the pretty Pansy Patch Suite. Pansies are one of my favorite flowers so I was happy to see this sweet set of products in the annual catalog. I didn’t do much stamping on this card – just the leaves and the greeting. The little pansy collage was done by die cutting the pansies from one of the sheets of the Pansy Petal Designer Series Paper that coordinates with the pansy dies.

Here is how I made the card. There are lots of steps, however, it wasn’t difficult!

  • Cut two pieces of Soft Succulent cardstock at 4 1/4″ x 11″. Score at 5 1/2″.
  • Place one piece in your paper trimmer and cut from the score line diagonally down to the opposite bottom corner. Repeat with other piece. You can put both pieces together and cut both at the same time if you prefer but you will have to add a little more pressure to make sure you cut evenly through both pieces. Fold on the score line and sharply crease with a bone folder. Adhere the two pieces together to form the card base. Use either Stampin’ Seal+ or Tear & Tape.
  • Cut a piece of Pansy Petal DSP at 4″ x 5 1/4″ and cut on the diagonal. If you don’t want to use the reverse side of the paper you can cut two different pieces. Note: if using paper with a directional pattern, make sure you are cutting it on the diagonal in the right direction!
  • Adhere DSP to the diagonal folds.
  • Adhere the diagonal sides to the bottom of the card base. Decide which DSP you would like to show more of and adhere the other flap first, placing a line of Tear & Tape at the bottom inside flap. Then place a piece of Tear & Tape along the bottom of the other flap and fold over the first flap to make the pocket.
  • Cut a piece of Evening Evergreen Open Weave Ribbon at 12 1/2″ and wrap around card front, with the two ends of the ribbon meeting in the front of the card. Secure with a piece of tape.
  • Make the pansy collage. I punched out a circle from a scrap piece of Whisper White cardstock to use as a base to build the collage. You can also use one of the Layering Circles dies.
  • Stamp two leaves from the Pansy Patch stamp set. This is a two-step set so first stamp the base with Evening Evergreen ink, stamping off once before stamping onto scrap piece of Basic White cardstock. Stamp the second leaf piece with the veins over the first leaf image with Evening Evergreen ink. Cut with coordinating die.
  • Using the piece of DSP with the different sizes and colors of pansies, select three pansies, one of the large images and two of the smaller images, and cut with coordinating dies.
  • Arrange the flowers and leaves on the circle base. Adhere the leaves first using Mini Glue Dots. Then adhere the large pansy. Adhere the two smaller pansies. Adhere the collage to the center of the envelope by adhering glue only to the bottom part of the collage so that the pocket is open in order to slide the note card into it.
  • To make the note card, cut a piece of Basic White cardstock at 4″ x 5 1/2″. I used the scalloped border die from the Penned Flowers die set to create the scalloped edge. You can use any other scalloped border die you might have in your collection. Stamp the greeting from the Pansy Patch stamp set with Evening Evergreen ink. Slide note card into envelope pocket.

Thanks for stopping by today!

Place an online order between $50 and $149 and use this host code for August. You will receive a free gift from me the following month.  If your order is $150 or more DO NOT use the host code. You will qualify for Stampin’ Rewards.

Product List
Pansy Dies
[155680]
$32.00
Paper Snips
[103579]
$10.00

Holiday Mini and Sale-A-Bration Begin Today

Hello! The July-December 2021 Mini Catalog, also known as the Holiday Mini Catalog, is live today! As always, there are so many fabulous new products to choose from for you to begin your fall, Halloween, Thanksgiving and Christmas crafting projects.

Click Here to View the Holiday Catalog

Please note that these items are not available yet because of continued supply chain delays due to Covid.

  • 156326 – Gingerbread & Peppermint Memories & More Card Pack
  • 156327 – Gingerbread & Peppermint Memories & More Cards & Envelopes
  • 156275 – Gingerbread & Peppermint Suite Collection
  • 156458 – Blackberry Beauty Specialty Designer Series Paper
  • 156278 – Blackberry Beauty Suite Collection

lt is also Sale-A-Bration time! This is the first time ever that Stampin’ Up! is running a second SAB in the same year! Earn FREE products at the $50 or $100 level. There are no limits on how many items you can earn with every $50 you spend on products from the Annual Catalog or Holiday Mini Catalog. Among the products are some fun holiday Designer Series Papers for you to choose from.

Click Here to View the Sale-A-Bration Brochure

Starter Kit Promotion!

Join Stampin’ Up! now through September 30th. You get to select $125 worth of products for only $99 and will also get a FREE bundle from the Holiday Catalog! The kit ships for free. I’d love to have you join my team. Become a happy discount shopper or build a business – the choice is yours! Click here for the benefits of joining Stampin’ Up!

Here is a list of bundles you can select from.

Need a catalog? If you would like a copy of the catalog and don’t currently have a demonstrator, please email me at rhondastamps@verizon.net and I’d be happy to mail it out to you.

Thanks for stopping by today!

The August Paper Pumpkin, Hope Box, was designed by Shelli Gardner, cofounder of Stampin’ Up. The kit includes supplies to make nine cards with coordinating envelopes. The box is specially designed to turn into a Hope Box—a keepsake box full of cherished items to add hope to your life or in the lives of others. Coordinating colors are bright and cheery: Bermuda Bay, Blackberry Bliss, Bumblebee, Melon Mambo, Petal Pink, Pool Party, Poppy Parade. Subscribe now through August 10th. The kit will arrive in your mailbox around the 20th of August. For further information and to subscribe, click here to visit my Paper Pumpkin website.

Place an online order between $50 and $149 and use this host code for July. You will receive a free gift from me the following month.  If your order is $150 or more DO NOT use the host code. You will qualify for Stampin’ Rewards.

Artistically Inked Best Wishes

Hello! It’s been over two weeks since my last post. Some of my readers know that I run an information consulting business and I never know when work will come my way, which is what happened shortly after that post! I was also preparing to do a business presentation last week, so had to put my blogging on a short hiatus. With that said, I’ve been busy all month since starting up in-person classes again. It has been great to see my customers once again and to meet a few new customers from 2020 in-person for the first time! I have a bunch of projects that I will be sharing in more upcoming blot posts. Today’s project is another card I made with the beautiful Artistically Inked Suite.

Here is how I made the card.

  • Card base – cut piece of Polished Pink cardstock at 5 1/2″ x 8 1/2″, score at 4 1/4″, fold and crease with a bone folder.
  • Cut piece of Pear Pizzazz cardstock at 4″ square. Cut piece of Expressions in Ink Designer Series Paper at 3 7/8″ square and adhere to Pear Pizzazz square.
  • Cut another piece of Pear Pizzazz cardstock at 3 1/4″ x 4″. Cut piece of Basic White cardstock at 3 1/8″ x 3 7/8″. Stamp the “best wishes” greeting from the Artistically Inked stamp set with Evening Evergreen ink in bottom right corner. Adhere to Pear Pizzazz cardstock.
  • Stamp all of the floral pieces on Basic White cardstock. Stamp the large flower with Polished Pink ink, stamping off once before stamping onto the cardstock. I found that the color was too intense for my liking without stamping off to tone it down a bit. Use the small stamp with the dots for the center of the flower. Stamp with Pale Papaya ink. Stamp the smaller flower with Pale Papaya ink. Stamp two double leaves and one single leaf with Evening Evergreen ink. Die cut all of the images with the Artistic Dies.
  • Make the flower collage by first adhering the leaves under the Polished Pink flower with Mini Glue Dots. Adhere the Pale Papaya flower to the Polished Pink flower with liquid glue. Adhere the collage to the greeting piece with Stampin’ Dimensionals.
  • Cut a 20″ piece of Polished Pink Open Weave ribbon and tie in a bow around the DSP piece. Adhere to card front. Adhere the floral piece over the DSP piece. Embellish with a few Pale Papaya Genial Gems.
  • Cut piece of Basic White cardstock at 4″ x 5 1/4″. Stamp the small flower grouping in lower left corner with Polished Pink ink, stamping off once before stamping onto cardstock. Stamp the birthday greeting from the Sunny Sentiments stamp set with Tuxedo Black Memento ink. I love the greetings in this stamp set, which can be found on page 38 in the 2021-2022 annual catalog. This has quickly become one of my new “go to” greeting sets! Adhere to inside of card.

Thanks for stopping by today!

The July-December 2021 Mini Catalog and August-September Sale-A-Bration promotion go live in just a few days on Tuesday, August 3rd! Customers that have shopped with me in the last year have already received their catalogs from me. If you do not have a demonstrator and would like copies of the catalogs please contact me and I would be happy to put them in the mail to you.

The August Paper Pumpkin, Hope Box, was designed by Shelli Gardner, cofounder of Stampin’ Up. The kit includes supplies to make nine cards with coordinating envelopes. The box is specially designed to turn into a Hope Box—a keepsake box full of cherished items to add hope to your life or in the lives of others. Coordinating colors are bright and cheery: Bermuda Bay, Blackberry Bliss, Bumblebee, Melon Mambo, Petal Pink, Pool Party, Poppy Parade. Subscribe now through August 10th. The kit will arrive in your mailbox around the 20th of August. For further information and to subscribe, click here to visit my Paper Pumpkin website.

Place an online order between $50 and $149 and use this host code for July. You will receive a free gift from me the following month.  If your order is $150 or more DO NOT use the host code. You will qualify for Stampin’ Rewards.

Product List

Hand-Penned Fun Fold-Kylie’s Training Blog Hop

Hello! Welcome to Kylie Bertucci’s Demonstrator Training Blog Hop for July. I’m part of a group of Stampin’ Up! demonstrators from around the world that participate in Kylie’s program for building our businesses. The theme for this year is thank you cards that we make as a way to show appreciation to our customers and teams. Please be sure to click on the names in the list at the end of this post to hop around and view the beautiful projects created by so many talented stampers.

Today’s card is a fun fold that features the Hand-Penned Suite. It is one of four cards we will be making in one of my classes this week. The Hand-Penned Designer Series Paper is so soft and pretty and I love the color palette.

Here is how I made the card.

  • Card base – cut piece of Misty Moonlight cardstock at 4 1/4″ x 11″, score at 5 1/2″, fold and crease with a bone folder. Cut the card front 1″ from the fold line. Cut a 1″ x 4 1/4″ strip from the Misty Moonlight piece that was cut off.
  • Cut two strips of DSP at 3/4″ x 4″ and adhere to the 1″ Misty Moonlight strips. Cut a piece of Daffodil Delight cardstock at 4″ x 5 1/4″ and adhere to card base.
  • Cut a piece of Basic White cardstock with the largest die from the Stitched So Sweetly die set.
  • Stamp two of the floral images from the Hand-Penned Petals stamp set with Tuxedo Black Memento ink on piece of Basic White cardstock. Color the flowers with Stampin’ Blends. I used Mint Macaron dark and light blends for the leaves, Daffodil Delight dark and light blends for the small flower and for the large flower I used Petal Pink dark and light blends and Flirty Flamingo light blend. When finished coloring, cut both flowers out with the coordinating die from the Penned Flowers Dies.
  • Adhere flowers to the Basic White scalloped piece with liquid glue. Place one flower in one direction and the other flower in the opposite direction, making sure not to put glue on the parts of the flowers that will hang off the edges of the Basic White piece. Leave a space in between the flowers in order to add the greeting.
  • Stamp the greeting with Tuxedo Black ink on scrap piece of Basic White cardstock and punch out with the Oval Punch or other punch or die that will fit the space. Adhere with Stampin’ Dimensionals.
  • Adhere top of art piece to bottom edge of the 1″ folded card base. Adhere the other 1″ strip to the bottom of the piece.
  • Embellish card with three Pale Papaya Genial Gems.

Thanks for stopping by today!

Place an online order between $50 and $149 and use this host code for June. You will receive a free gift from me the following month.  If your order is $150 or more DO NOT use the host code. You will qualify for Stampin’ Rewards.

Product List