Dainty Delight Card

Hello!

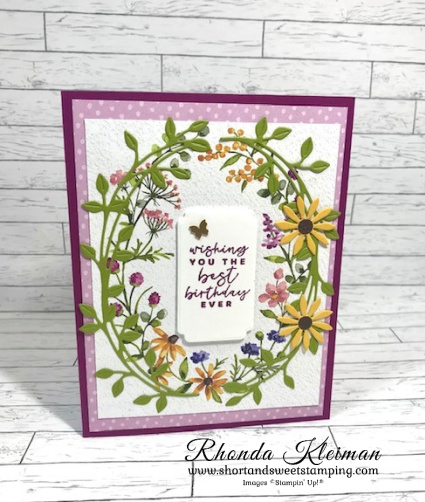
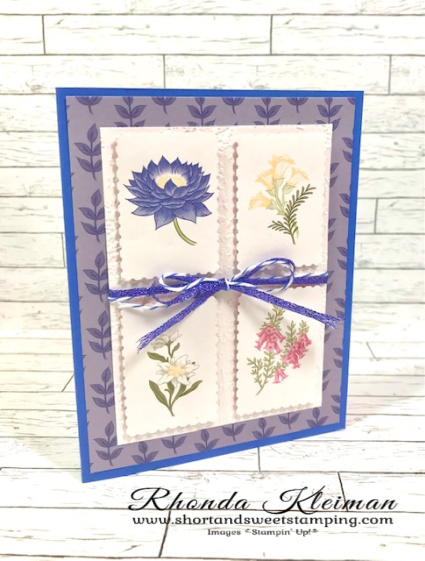
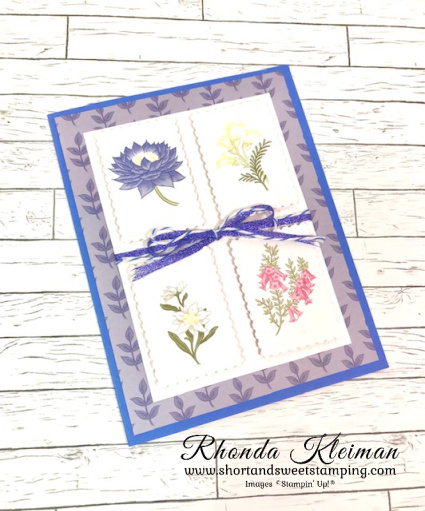
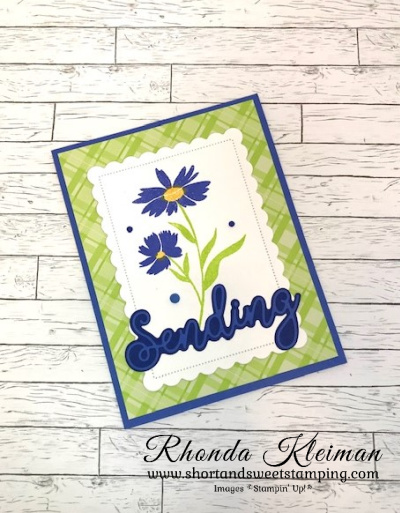
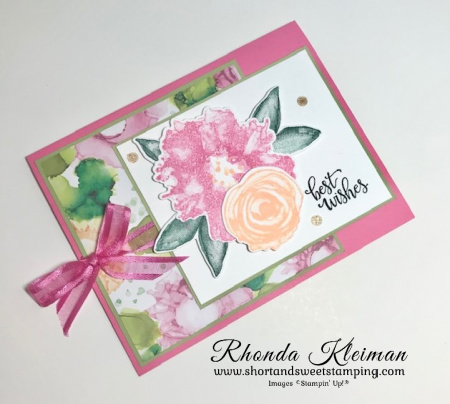
Today’s card features the Dainty Delight bundle and the pretty Dainty Flowers Designer Series Paper that you can earn for free with a $50 purchase during Sale-A-Bration. I love it when the DSP does most of the work for you! There are two sheets of floral wreaths that can be cut down to card size, which is what I used as the focal point.

Here is how I made the card.

  • Card base – cut a piece of Rich Razzleberry cardstock at 5 1/2″ x 8 1/2″, score at 4 1/4″, fold and crease with a bone folder.
  • Cut a piece of the Dainty Flowers DSP with the Fresh Freesia and white polka dot print at 4″ x 5 1/4″ and adhere to card front.
  • Cut a floral wreath at 3 3/4″ x 4 3/4″ from the sheet of wreaths and adhere to card front.
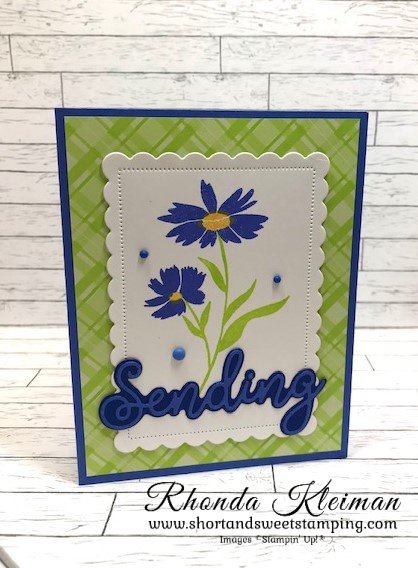
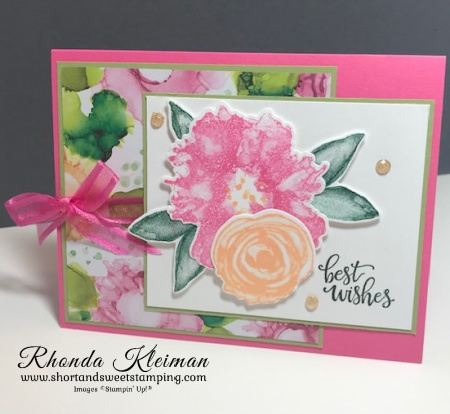
  • Cut a piece of Old Olive cardstock at 4 1/2″ x 5 1/4″. Cut a piece of adhesive sheet to the same size and adhere the sheet to the cardstock. Run the piece through a die cutting machine two times with the long leaf sprig die from the Dainty Delight Dies. Pull adhesive backing off the die cuts and adhere the sprigs to both side of the wreath.
  • Die cut two daisies from a scrap piece of Crushed Curry cardstock. Die cut two flower centers with a scrap piece of Soft Suede cardstock. Adhere flower centers to daisies with a small dot of liquid glue. Adhere daisies to right side of wreath.
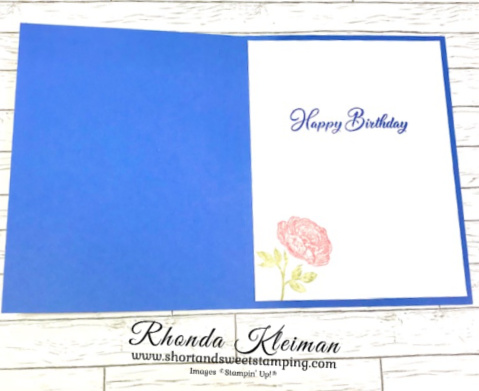
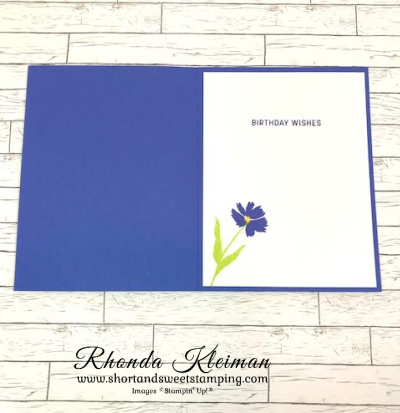
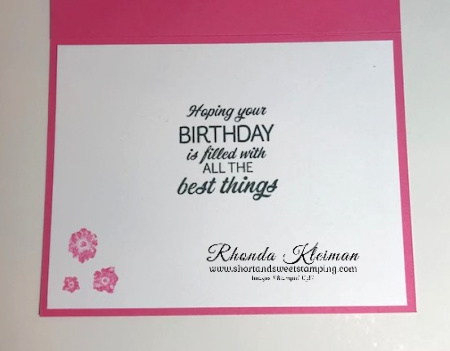
  • For the center greeting piece, cut a piece of Basic White cardstock at 1 1/2″ x 2 1/2″ and run through die cutting machine with the smallest of the rectangle-shaped dies from the Something Fancy Dies. Stamp greeting with Rich Razzleberry ink. The greetings that are in the stamp set didn’t fit the label so I used the birthday greeting from the Season of Chic stamp set, which was a perfect fit! Adhere to center of wreath with Stampin’ Dimensionals.
  • Embellish with a large Brushed Brass Butterfly.

Thanks for stopping by today!

There is one week left for you to take advantage of three limited time options to join Stampin’ Up!

Option 1 – The exclusive Boho Blue Mini Stampin’ Cut & Emboss Machine ($63 value) plus your choice of $175 of products for only $129.
Option 2 – The original white Mini Stampin’ Cut & Emboss Machine ($63 value) for only $129.
Option 3 – Your choice of $175 of products for only $99.

The starter kit ships for free and you will enjoy a 20%-25% discount on all future orders. Become a happy discount shopper or build a business – the choice is yours! The first quarter that you join you can take advantage of all the benefits. At the next full quarter you are required to have $300 in sales, which can be personal sales or from orders you get from others. If you do not meet the minimum, you are free to drop at no penalty! I’d love to have you join my team! Feel free to contact me at rhondastamps@verizon.net for further information. Click here to join.

Place an online order between $50 and $149 and use this host code for February. You will receive a free gift from me the following month.  If your order is $150 or more DO NOT use the host code. You will qualify for Stampin’ Rewards.

Product List

Abigail Rose Suite Cards

Hello!

Today I have two cards for you, both using the lovey Abigail Rose Suite in the annual catalog. Sadly, I’ve had to make four sympathy cards between Christmas and New Year’s Day. For some reason, I never seem to get around to using this suite so I decided to finally break it open. While I was at it, I needed to make a birthday card for a friend so made two cards with the suite as well.

Here is how I made this sympathy card.

  • Card base – Cut a piece of Petal Pink cardstock at 5 1/2″ x 8 1/2″, score at 4 1/4″, fold and crease with a bone folder.
  • Cut a piece of the Petal Pink stripe paper from the Abigail Rose Designer Series Paper at 4″ x5 1/4″ and adhere to card front.
  • Cut a piece of DSP with the script on the Early Espresso background at 2 7/8″ x 4 3/8″. Lightly color in the flowers with the light and dark Petal Pink Stampin’ Blends. Color the stems with the light Mint Macaron Stampin’ Blend. Adhere to a piece of Crumb Cake cardstock cut at at 3″ x 4 1/2″.
  • Cut a piece of Crumb Cake cardstock at 1 3/4″ x 3″. Stamp sympathy greeting from the Something Fancy stamp set from the January-April 2023 Mini Catalog with Early Espresso ink. Run through die cutting machine with a label from the Something Fancy Dies.
  • Cut a piece of Natural 1/2″ Woven Ribbon at 12″. Wrap around tulip piece and tie in a knot on the left side. The ribbon is from the now-retired July-December 2022 Holiday Catalog. If you don’t have this ribbon you can substitute it with something else in your stash. Adhere greeting over the ribbon. Adhere the tulip piece to front of card.

Here is how I made this birthday card.

  • Cut a piece of Early Espresso cardstock at 4 1/4″ x 11″, score at 5 1/2″, fold and crease with a bone folder.
  • Cut a piece of Abigail Rose DSP at 3 3/4″ x 5 and run through die cutting machine with the next to largest Deckled Rectangle Die. Adhere at a slight angle to card front.
  • Cut a piece of the DSP that looks like a notebook page at 3 1/4″ x 4 3/4″ and run through die cutting machine with the third largest Deckled Rectangle Die. Adhere at an opposite angle to the first piece of DSP.
  • Cut a 3 1/2″ square of Very Vanilla cardstock. Stamp floral image from the Cottage Rose stamp set with Memento Black ink. Color the large flower with light and dark So Saffron Stampin’ Blends. Color the center of the flower with dark Crumb Cake Stampin’ Blend. Add Wink of Stella to the center. Color the leaves with light and dark Old Olive Stampin’ Blends. Color the tiny flowers with light Fresh Freesia Stampin’ Blend.
  • Run piece through die cutting machine with coordinating Cottage Flowers Dies. Adhere to card front with Stampin’ Dimensionals.
  • Stamp birthday greeting with Early Espresso ink on scrap piece of Very Vanilla cardstock. Run through die cutting machine with die from the Something Fancy Dies. Adhere to card front.
  • Add some bling with a few Champagne Rhinestones.

Thanks for stopping by today!

Make cloudy days a little brighter with the Sunshine & Smiles Paper Pumpkin Kit! This kit includes nine sweet and sunny cards—three each of three designs. If someone you know is weathering a storm, this kit is just what you’ll need to create cards that are sure to brighten their day! AND for the first time ever, we’ve got a coordinating die add-on! (Stampin’ Cut & Emboss Machine sold separately).

The kit contains everything you need to make nine cards, 3 each of 3 different designs and nine coordinating envelopes; photopolymer stamp set; Mango Melody Stampin’ Spot; peek-through window scene on each card front; precut critters, labels, raindrop embellishments and more. Coordinating colors are: Balmy Blue, Cajun Craze, Coastal Cabana, Daffodil Delight, Flirty Flamingo, Mango Melody, Old Olive, Shaded Spruce.

Purchase the Sunshine & Smiles Dies as an add-on. Cost is $6.00 and includes one frog-shaped die and one flower bouquet die. You can order this from my online store using Item #162486.

Place an online order between $50 and $149 and use this host code for January. You will receive a free gift from me the following month.  If your order is $150 or more DO NOT use the host code. You will qualify for Stampin’ Rewards.

Product List

Framed Florets Birthday Card

Hello!

The Fitting Florets Collection is now available! The collection consists of the Framed Florets Bundle, Framed & Festive Stamp Set, Fitting Florets Designer Series Paper and Gold Adhesive Backed Swirls. The Framed Florets Bundle will be carrying over into the January-June 2023 Mini Catalog. The Framed & Festive stamp set, DSP and gold swirls will be available until January 4, 2023 or while supplies last. This is a birthday card I made with the bundle and DSP.

Here is how I made the card.

  • Card base – cut a piece of Balmy Blue cardstock at 4 1/4″ x 11″, score at 5 1/2″, fold and crease with a bone folder.
  • Cut a piece of the Fitting Florets DSP at 4″ x 5 1/4″ and adhere to card front.
  • Cut a piece of Basic White cardstock at 3 1/4″ x 4″. Run through die cutting machine with the smallest oval frame die from the Framed Florets dies. Adhere the outer frame to the card front with liquid glue. Stamp the greeting with Balmy Blue ink on the solid oval piece from the die cut. Adhere inside the frame.
  • Cut a piece of Basic White cardstock at 1 1/2″ x 3 1/2″ and stamp the long floral image with Memento Black ink. Color the flowers with dark and light Polished Pink, Balmy Blue and Daffodil Delight Stampin’ Blends. Color the leaves with the light Evening Evergreen Stampin’ Blends, dark and light Mint Macaron and Soft Succulent Stampin’ Blends. Run through die cutting machine with coordinating die.
  • Die cut three leaves from scrap piece of Soft Succulent cardstock. Adhere one leaf at the top of the floral piece and two leaves at the bottom with Mini Glue Dots.
  • Adhere floral piece to left side of oval with Stampin’ Dimensionals.
  • Cut two pieces of white twine from the Bakers Twine Essentials Pack and tie in a double bow. Trim ends and adhere to bottom of floral piece with a Mini Glue Dot. Adhere two of the smallest size Basic Pearls above the stamped greeting.
  • Cut a piece of Basic White cardstock at 4″ x 5 1/4″. Stamp two of the small flower images with Memento Black ink in the top and bottom corners. Color with light and dark Polished Pink Stampin’ Blends. Stamp greeting with Balmy Blue ink. Adhere to inside of card.

Thanks for stopping by today!

Place an online order between $50 and $149 and use this host code for November. You will receive a free gift from me the following month.  If your order is $150 or more DO NOT use the host code. You will qualify for Stampin’ Rewards.

Product List

Wonderful World Postage Stamp Card

Hello!

Tomorrow is the last day of Sale-A-Bration! I have one more card for you featuring the Wonderful World Stamp Set and Designer Series Paper that is still available as a free gift with a $100 purchase.

Here is how I made the card.

  • Card base – Cut a piece of Orchid Oasis cardstock at 5 1/2″ x 8 1/2″, score at 4 1/4″ and crease with a bone folder.
  • Cut a piece of the Wonderful World DSP at 4″ x 5 1/4″ and adhere to card front.
  • Cut a piece of Basic White cardstock at 3 1/4″ x 4 1/2″ and run through the Stampin’ Cut & Emboss Machine with the Timeworn Type 3D Embossing Folder.
  • Use the Rectangular Postage Stamp Punch to cut four assorted flowers from the DSP sheet with rows of different flowers. Adhere the pieces to the embossed piece with Mini Stampin’ Dimensionals in the four corners of each of the pieces, spacing them evenly and leaving some extra space in the middle in order to tie the ribbon.
  • Cut a length of Orchid Oasis 1/8″ Metallic Woven Ribbon and another with the Orchid Oasis Bakers Twine from the 2022-2024 Bakers Twine Pack. Tie into a bow around the middle of the floral piece and trim ends. Adhere piece to card front.
  • Cut a piece of Basic White cardstock at 4″ x 5 1/4″. Stamp the rose image from the Wonderful World stamp set in the bottom left corner by using the direct to rubber technique. Color the flower part of the stamp with a Flirty Flamingo Stampin’ Write Marker and the leaves with a Pear Pizzazz Marker. Huff on the stamp to activate the ink and stamp in the corner. I used the birthday greeting from the Go To Greetings stamp set and stamped with Orchid Oasis ink. Adhere to inside of card.

This was a quick and easy card to put together.

Thanks for stopping by today!

Select free items with every $50 or $100 purchase. There is no limit on the number of times you can earn free items. Please note that all SAB prroducts are only available while supplies last. The Pool Party and Soft Sea Foam Cards & Envelopes (Item #159940), Tree Lot Dies (Item #159938) and Hippo Dies (Item #159928) are no longer available.

The Brushed Metallic Cardstock (Item #163103) and Silver Foil Specialty Pack (Item #163096) are no longer available as free Sale-A-Bration items, however, they are still available for purchase in the annual catalog. Brushed Metallic Cardstock, Item #153524, $15.00 and Silver Foil Specialty Pack, Item #156457, $10.00.

Get your Halloween crafting on with the Spooky Treats Paper Pumpkin Kit. This month’s kit includes everything you need to make 18 adorable treat boxes—that’s 6 each of 3 unique designs. This all-inclusive kit includes printed box bases and tops, die-cut paper pieces, adhesives, and an Orchid Oasis Classic Stampin’ Spot. This kit’s stamp set puts the TREAT in trick-or-treat with fun, Halloween-themed sentiments and designs. Embrace the spooky season with ghost, bat, spider, and star images. This kit also includes a special peek-through box top on one of the box designs. Coordinating Stampin’ Up! colors: Basic Black, Gray Granite, Orchid Oasis, Fresh Freesia, Crushed Curry, Pumpkin Pie. For further information and to subscribe to the August kit, visit my Paper Pumpkin website here.

Place an online order between $50 and $149 and use this host code for August. You will receive a free gift from me the following month.  If your order is $150 or more DO NOT use the host code. You will qualify for Stampin’ Rewards.

Product List
Paper Snips
[103579]
$11.00

Sending Birthday Wishes

Hello!

Today’s card features the Sending Smiles Bundle from the new 2022-2023 Annual Catalog. This is a very versatile stamp set because it includes so many of what I would consider to be basic and most commonly used types of greetings. The floral images are easy to stamp and are sure to bring cheer! I couldn’t wait to start playing with the new In Colors and love the combination of Parakeet Party and Orchid Oasis.

Here is how I made the card.

  • Card base – cut a piece of Orchid Oasis cardstock at 5 1/2″ x 8 1/2″, score at 4 1/4″, fold and crease with a bone folder.
  • Cut a piece of the Parakeet Party plaid print from the 2022-2024 In Color Designer Series Paper at 4″ x 5 1/4″ and adhere to card front.
  • Cut a piece of Basic White cardstock at 3 1/2″ x 4 3/4″ and run through the Stampin’ Cut & Emboss Machine with the next-to-largest rectangle die from the Scalloped Contours Dies.
  • Stamp the larger leaf image in the Sending Smiles stamp set on the scalloped rectangled piece with Parakeet Party ink. Stamp the two flower images with Orchid Oasis ink. Stamp the centers of the flowers with Daffodil delight ink.
  • Cut a piece of Starry Sky cardstock at 2″ x 4″ and run through the Cut & Emboss Machine with the solid “Sending” die from the Sending Dies set. Cut a piece of Orchid Oasis cardstock at 2″ x 4″. Cut a piece of an adhesive sheet the same size and adhere it to one side of the cardstock. Run through the Cut & Emboss Machine with the open script “sending” die. Peel adhesive backing off the piece and carefully adhere it to the Starry Sky piece.
  • Adhere scalloped rectangle piece to card front. Adhere the “sending” piece to the bottom of this piece with liquid glue. Adhere three Orchid Oasis 2022-2024 In Color Matte Decorative Dots to the card front.
  • Cut a piece of Basic White cardstock at 4″ x 5 1/4″. Stamp the birthday greeting with Starry Sky ink. Stamp the smaller leaf in the lower left corner with Parakeet Party ink. Stamp the flower with Orchid Oasis ink and stamp the inside of the flower with Daffodil Delight ink.

This is a quick and easy card to make. Give it a try with different color combinations!

Thanks for stopping by today!

If you love the new In Colors, now is the time to take advantage of this great In Color Starter Kit Promotion!

Join Stampin’ Up! from May 3-May 31. Choose $125 worth of products for $99 plus get $66.50 in bonus 2022-2024 In Color Products for free! Here are the free items that will be added to your starter kit.

  • 2022-2024 In Color Grid Paper – Item number 160009
  • 2022-2024 In Color Ink Pad Collection – Item number 161108
  • 2022-2024 In Color Cardstock Collection – 159204
  • 2022 In Color 6″ x 6″ Designer Series Paper Assortment – Item number 159253

In addition, you will receive a free Paper Pumpkin Kit and free shipping. You do not have to build a business! Become a happy discount shopper and enjoy a minimum 20% discount on all future orders. Click here to learn more about the benefits of joining Stampin’ Up! For further information about joining my team, click here.

Place an online order between $50 and $149 and use this host code for May. You will receive a free gift from me the following month.  If your order is $150 or more DO NOT use the host code. You will qualify for Stampin’ Rewards.

Product List

Seas the Day Birthday Card

Hello! Last Sunday my father turned 100 years old! He is a wonderful man and I treasure every minute I’m able to spend with him. I set up a Zoom gathering so that family and friends could join in the celebration and we had a great time reminiscing. One of my most favorite stamp sets for making cards for men is Sailing Home and I decided to use the light house as focal point. I also thought that the large frame die in the Sea Dies from the Seas the Day bundle would be a perfect accent. The Simply Marbelous Designer Series Paper, one of the free Sale-A-Bration items, made for a great background piece because it looks like water. I used bits and pieces from several other stamp and die sets, making this card a mashup!

Here is how I made the card.

  • Card base – cut a piece of Misty Moonlight cardstock at 5 1/2″ x 8 1/2″, score at 4 1/4″, fold and crease with a bone folder.
  • Cut a piece of Balmy Blue cardstock at 4″ x 5 1/4″. Run through the Stampin’ Cut and Emboss Machine with the large frame die from the Sea Dies set. Use a sponge dauber or blending brush and Shaded Spruce ink to lightly accent the seaweed pieces at the bottom of the frame.
  • Cut a piece of Basic White cardstock at 2 1/2″ x 3 1/2″. Stamp the lighthouse from the Sailing Home stamp set with Basic Gray ink. Run through die cutting machine with the coordinating die from the Smooth Sailing Dies set. Brush Wink of Stella over the image.
  • Stamp greeting from the Handsomely Suited stamp set on scrap piece of Basic White cardstock with Misty Moonlight ink. Cut out with any die or punch that will fit the greeting.
  • Cut a piece of the Balmy Blue paper from the Simply Marbleous DSP at 4″ x 5 1/4″. At the bottom third of the paper, stamp the sand image from the Oceanfront stamp set with Crumb Cake ink multiple times. Stamp the long leaf image on the right side of the paper with Shaded Spruce ink three times. Stamp the seagulls from the Sailing Home stamp set in the upper middle of the paper with Misty Moonlight ink two times.
  • Place the lighthouse on the DSP and then place the frame over it to position the lighthouse. Once it looks good, remove the frame and adhere the lighthouse. Adhere the frame over the DSP. Adhere piece to card base.
  • Adhere the greeting with dimensionals. Adhere a variety of Pebbles Enamel Shapes around the bottom of the frame.
  • For the inside of the card, cut a piece of Basic White cardstock at 4″ x 5 1/4″. Stamp greeting from the Inspired Thoughts stamp set. This set has a wonderful variety of greetings for all occasions. Stamp Happy Birthday on scrap piece of cardstock . I used the greeting from the Artistically Inked stamp set and cut the words apart.
  • For the numbers, cut a piece of an adhesive sheet the same size as a scrap piece of Misty Moonlight cardstock. Use the numbers from the Playful Alphabet Dies and run through the die cutting machine. Arrange the words and numbers and adhere. I also used part of the remaining piece of DSP to cut a strip at 3/4″ x 4″ and adhered on the reverse side at the bottom of the piece. Adhere entire piece to inside of card.

Thanks for stopping by today!

Answer the call of the wild—and your creativity—with the Safari Celebration Paper Pumpkin Kit. This playful, party-themed kit includes all the goodies and gear you need to create nine cards and coordinating envelopes in safari-inspired shapes and patterns you’ll go wild for! Make every occasion a celebration with this month’s amusing animals, beautiful botanicals, and celebratory sentiments. Card size is 4 1/4″ x 5 1/2″, 3 each of 3 different designs. A Rich Razzleberry Stampin’ Spot comes in the kit. Coordinating colors: Bumblebee, Fresh Freesia, Pear Pizzazz, Rich Razzleberry, Soft Succulent, Soft Suede. Visit my Paper Pumpkin website here to subscribe and order the kit.

A new addition to the Kits Collection: Light the Candles—a birthday card kit, is now available. This kit features bright colors, sparkly embellishments, and a simple peek-through technique. These cards are perfect for wishing the happiest of birthdays, or to use as invitations to an exciting birthday bash! Now is the perfect time to stock up on birthday cards to use throughout the year. The kit includes supplies to create 8 cards, 2 each of 4 different designs; printed card bases and die cuts, embellishments, adhesives, clear block; exclusive stamp set and Coastal Cabana Stampin’ Spot; Coordinating colors: Coastal Cabana, Daffodil Delight, Magenta Madness, Mango Melody, Night of Navy. Item #159332, Cost of Kit is $19.00. To purchase the kit, visit my online store by clicking on the shop online icon at the bottom of this post.

Place an online order between $50 and $149 and use this host code for January. You will receive a free gift from me the following month.  If your order is $150 or more DO NOT use the host code. You will qualify for Stampin’ Rewards.

Product List
Sea Dies
[157857]
$36.00

Artistically Inked Best Wishes

Hello! It’s been over two weeks since my last post. Some of my readers know that I run an information consulting business and I never know when work will come my way, which is what happened shortly after that post! I was also preparing to do a business presentation last week, so had to put my blogging on a short hiatus. With that said, I’ve been busy all month since starting up in-person classes again. It has been great to see my customers once again and to meet a few new customers from 2020 in-person for the first time! I have a bunch of projects that I will be sharing in more upcoming blot posts. Today’s project is another card I made with the beautiful Artistically Inked Suite.

Here is how I made the card.

  • Card base – cut piece of Polished Pink cardstock at 5 1/2″ x 8 1/2″, score at 4 1/4″, fold and crease with a bone folder.
  • Cut piece of Pear Pizzazz cardstock at 4″ square. Cut piece of Expressions in Ink Designer Series Paper at 3 7/8″ square and adhere to Pear Pizzazz square.
  • Cut another piece of Pear Pizzazz cardstock at 3 1/4″ x 4″. Cut piece of Basic White cardstock at 3 1/8″ x 3 7/8″. Stamp the “best wishes” greeting from the Artistically Inked stamp set with Evening Evergreen ink in bottom right corner. Adhere to Pear Pizzazz cardstock.
  • Stamp all of the floral pieces on Basic White cardstock. Stamp the large flower with Polished Pink ink, stamping off once before stamping onto the cardstock. I found that the color was too intense for my liking without stamping off to tone it down a bit. Use the small stamp with the dots for the center of the flower. Stamp with Pale Papaya ink. Stamp the smaller flower with Pale Papaya ink. Stamp two double leaves and one single leaf with Evening Evergreen ink. Die cut all of the images with the Artistic Dies.
  • Make the flower collage by first adhering the leaves under the Polished Pink flower with Mini Glue Dots. Adhere the Pale Papaya flower to the Polished Pink flower with liquid glue. Adhere the collage to the greeting piece with Stampin’ Dimensionals.
  • Cut a 20″ piece of Polished Pink Open Weave ribbon and tie in a bow around the DSP piece. Adhere to card front. Adhere the floral piece over the DSP piece. Embellish with a few Pale Papaya Genial Gems.
  • Cut piece of Basic White cardstock at 4″ x 5 1/4″. Stamp the small flower grouping in lower left corner with Polished Pink ink, stamping off once before stamping onto cardstock. Stamp the birthday greeting from the Sunny Sentiments stamp set with Tuxedo Black Memento ink. I love the greetings in this stamp set, which can be found on page 38 in the 2021-2022 annual catalog. This has quickly become one of my new “go to” greeting sets! Adhere to inside of card.

Thanks for stopping by today!

The July-December 2021 Mini Catalog and August-September Sale-A-Bration promotion go live in just a few days on Tuesday, August 3rd! Customers that have shopped with me in the last year have already received their catalogs from me. If you do not have a demonstrator and would like copies of the catalogs please contact me and I would be happy to put them in the mail to you.

The August Paper Pumpkin, Hope Box, was designed by Shelli Gardner, cofounder of Stampin’ Up. The kit includes supplies to make nine cards with coordinating envelopes. The box is specially designed to turn into a Hope Box—a keepsake box full of cherished items to add hope to your life or in the lives of others. Coordinating colors are bright and cheery: Bermuda Bay, Blackberry Bliss, Bumblebee, Melon Mambo, Petal Pink, Pool Party, Poppy Parade. Subscribe now through August 10th. The kit will arrive in your mailbox around the 20th of August. For further information and to subscribe, click here to visit my Paper Pumpkin website.

Place an online order between $50 and $149 and use this host code for July. You will receive a free gift from me the following month.  If your order is $150 or more DO NOT use the host code. You will qualify for Stampin’ Rewards.

Product List