Field of Flowers

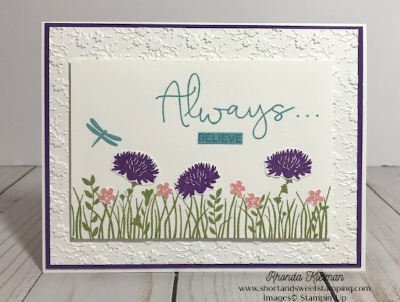
Hello! Today I’m sharing another card I recently made with the Field of Flowers stamp set. I combined it with the Ornate Floral embossing folder that is part of the Ornate Gardens Suite and love how it compliments the stamped images.

Here is how I made the card:

  • Card base – cut a piece of Whisper White Thick cardstock at 5 1/2″ x 8 1/2″, score at 4 1/4″ and fold in half.
  • Cut piece of Gorgeous Grape cardstock at 4 1/8″ x 5 3/8″ and adhere to card base.
  • Cut piece of Whisper White cardstock at 4″ x 5 1/4″ and run through an embossing machine with the Ornate Floral embossing folder. Adhere to Gorgeous Grape layer.
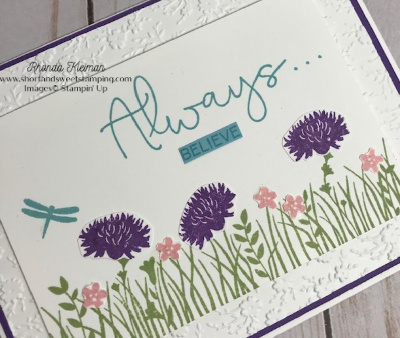
  • Cut piece of Whisper White cardstock at 3″ x 4 3/8″. Stamp large grass image with Pear Pizzazz ink. Stamp “always” greeting with Balmy Blue ink. Stamp “believe” with Balmy Blue ink on scrap piece of Balmy Blue cardstock and trim with paper snips. Adhere underneath greeting . Stamp dragonfly with Balmy Blue ink and brush with clear Wink of Stella.
  • Stamp the flower image three times with Gorgeous Grape ink on scrap piece of Whisper White cardstock and fussy cut with paper snips. Stamp the smallest flowers with Blushing Bride ink and fussy cut. You can also punch these flowers out with the coordinating Confetti Flowers Border Punch. Adhere to grass image with liquid glue. Brush with Wink of Stella.
  • Adhere stamped image to embossed layer with Stampin’ Dimensionals.
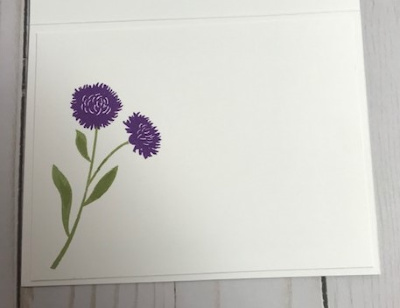
  • Cut piece of Whisper White cardstock at 4″ x 5 1/4″. Stamp large single leaf image with Pear Pizzazz ink in lower left corner. Stamp flowers with Gorgeous Grape ink. Adhere piece to inside of card.
Bonus Days are Here!

Bonus Days are back once again! From July 1 through August 3rd, for every $50 you spend (before shipping & tax) you will receive a $5 Bonus Day coupon code that can be used from August 4th – 31st.

  • You must have an email address in order to participate because the codes can only be delivered electronically.
  • If you earn multiple coupons in a single order, all of the codes will be sent in one email. If you earn multiple coupons for multiple orders they will be sent in separate emails for each code earned.
  • There is no limit on the number of coupon codes you can earn during this promotion.

Thanks for stopping by today!

 Product List  
Paper Snips
[103579]
$10.00

Beautiful Friendship

Hello and Happy Passover to my Jewish friends and customers! I hosted a virtual Seder on FaceTime with a few friends yesterday and this evening will attend my temple’s second night Seder on Zoom. Although we are not able to be with our friends and loved ones in person, it is a wonderful way to still be able to spend some holiday time together.

Today I’m sharing a card featuring the Beautiful Friendship stamp set from the 2019-2020 annual catalog. I purchased it months ago and hadn’t used it yet, between the holiday catalog and the mini catalog releases keeping me busy, so finally cracked it open earlier this week. I made it for an elderly friend that lives in a local skilled nursing home and hope it cheered her up. I chose to work with a soft color palette, which can sometimes be out of my comfort zone, as I prefer more of the brights and jewel tones, but I’m so pleased with how it came out.

Here is how I made the card.

  • Card base – cut piece of Rococo Rose cardstock at 5 1/2″ x 8 1/2″, score and fold in half.
  • Cut piece of Seaside Spray cardstock at 5 3/8″ x 4 1/8″ and adhere to card base.
  • Cut piece of Whisper White cardstock at 4″ x 5 1/4″. Stamp large rose image with Rococo Rose ink. Stamp two small roses above large rose image. Stamp centers of large rose image with So Saffron ink.
  • Stamp two blue flowers with Seaside Spray ink on either side of the roses.
  • Stamp purple flowers around bottom of large rose image. I stamped them with the Purple Posy ink pad, which was discontinued due to issues with the ink quality. However, you can color the stamp with a Purple Posy Stampin’ Write Marker.
  • Stamp leaves around the flowers with Soft Sea Foam ink. For an extra touch and to fill in some white spots around the flowers I stamped the dots from the Painted Harvest stamp set with So Saffron ink.
  • Heat emboss the sentiment from the Good Morning Magnolia stamp set. Stamp image with Versamark ink on scrap piece of Seaside Spray cardstock and use a heat tool to emboss with White Stampin’ Emboss Powder. Punch out with the Pretty Label punch.
  • Cut piece of Polka Dot Tulle Ribbon and tie around stamped image with a single knot. Trim ends. Adhere piece to card. Adhere punched sentiment piece over the ribbon using Stampin’ Dimensionals.

For the inside of the card, cut a piece of Whisper White cardstock at 4″ x 5 1/4″. Stamp small rose in bottom left corner, stamp leaves and stamp dots. I chose a sentiment from the Slice of Happiness set and stamped it with Seaside Spray ink.

This card was fun, quick and easy to put together!

Thanks for stopping by today!

 Product List  

Last Day for Sale-A-Bration 2020 – Lily Impressions Card

There are just a few hours left for Sale-A-Bration 2020. Now is your last chance to get a free gift with your $50 or $100 purchase. These products will not be carried over into the 2020-2021 annual catalog. Here is a card I made with the Lily Impressions Designer Series Paper. The colors in these papers are bold and bright!

Here is how I made the card.

  • Card base – cut piece of Highland Heather cardstock at 4 1/4″ x 11″, score and fold in half.
  • Cut piece of Lily Impressions Designer Series Paper at 4 1/4″ x 5 1/2″. Cut bottom edge into a triangular point. I made a template from a piece of Whisper White cardstock, traced around the pointed edge and cut out with paper snips.
  • Randomly stamp small flower image from the Lovely Lily Pad stamp set with Gorgeous Grape ink on bottom half of card front. Adhere the DSP to the card. This stamp set is also a SAB item.
  • For the butterfly, cut piece of DSP at 2 1/2″ x 4 1/2″. I used the same paper design and cut it with die in the Springtime Impressions set in the annual catalog. At first I thought I’d use the reverse side of the paper, which is Lovely Lipstick and looks like a watercolor wash, but I liked how the effect of the floral side of the paper looked much better. Attach the butterfly by adding Mini Stampin’ Dimensionals to the center of the piece and then slightly curl in the wings. Add four Noble Peacock Rhinestones along the center for some added bling.
  • For the sentiment I used the Tags in Bloom stamp set, another SAB item. Stamp with Coastal Cabana ink on scrap piece of Whisper White cardstock. Punch out with the Label Me Fancy Punch from the mini catalog.
  • For the Coastal Cabana piece I used the Happy Birthday stamp from the Layered With Kindness set from the mini catalog. I didn’t want the birthday greeting so I colored only the frame design with a Stampin’ Write Marker. You can also stamp the entire image because when you tape the sentiment piece down it will be covered up. Punch out with the Label Me Lovely Punch. Adhere greeting to this piece and attach to card front with Stampin’ Dimensionals.

Thanks for stopping by today!

 Product List  
Paper Snips
[103579]
$10.00

Daisy Lane Meets Flowering Foils

Hello! I hope that you are managing okay during these very extraordinary circumstances. One way to stay connected to family, friends, neighbors and colleagues alike is to “make a card, send a card.” I know most of you are sitting on a stockpile of stamping supplies, so what better time than now to get them out and create cards. They don’t have to be elaborate – stamps, ink, paper is all it takes, as it is mostly the thought that counts!

For today’s card I’m featuring a thank you card I made for customers that attended my February Stamping Club. By the time I had a chance to sit down and make the cards, the shelter in place directive had taken effect, so I decided to make the cards extra special and do something bright and cheerful too! I used the Daisy Lane stamp set and coordinating daisy punches, which I haven’t used in a while, along with the beautiful Flowering Foils Specialty Designer Series Papers, one of the products in the Sale-A-Bration second release.

Here is how I made the card.

  • Card base – cut piece of Pineapple Punch cardstock at 5 1/2″ x 8 1/2″, score and fold in half.
  • Cut piece of Melon Mambo cardstock at 4 1/8″ x 5 3/8″ and adhere to card front.
  • Cut piece of Flowering Foils DSP at 4″ x 5 1/4″. I selected Pineapple Punch, Grapefruit Grove and Melon Mambo for my color palette and used a sponge brayer to cover the DSP with the three different ink colors. Simply roll the brayer over the ink pad several times until the sponge picks up the ink and then roll it across the paper. Depending on how intense you want the color to be, you can keep reinking and sponge rolling. First I put down the Pineapple Punch, then the Grapefruit Grove and then the Melon Mambo, slightly overlapping each of the colors. I then went back a second time to further blend the lines together for each of the colors.
  • Stamp two large daisies and one small daisy from the Daisy Lane Stamp set for each finished daisy. One set is stamped with Pineapple Punch ink and the other with the Grapefruit Grove ink. Adhere the three daisies together with liquid glue.
  • Stamp greeting on a scrap piece of Whisper White cardstock cut at 1/2″ x 2 3/4″. I used the “a little note” from the Butterfly Gala stamp set not only because I like the greeting but I also like the type font too. Using a pair of paper snips, flag one of the ends to make a banner.
  • To put the card together, position the daisies where you’d like them and before adhering them down on the foil paper, first adhere the greeting with liquid glue, positioning one of the ends underneath a daisy. Adhere first daisy over the greeting and then adhere the second daisy, slightly overlapping the first one. Adhere piece to Melon Mambo mat. For the final touch, add a Perennial Essence Floral Center to each daisy.

Sale-A-Bration ends tomorrow, March 31st, so you still have two days left to place an order of $50 or more to receive your free SAB items. If you love this beautiful Flowering Foil DSP, this is your last chance! It is also your last chance to purchase the Coordination Products that have been designed to coordinate with several SAB and Mini-Catalog products.

Tomorrow is also the last day to take advantage of this great offer to join Stampin’ Up! Build your starter kit by picking $125 worth of products for $99. Click here to join.

  • Get a FREE mini paper cutter and a selection of 6×6 Designer Series Papers from the Mini Catalog. The cutter is great for working with smaller pieces of Designer Series Paper or cardstock, as well as scraps! It is exclusive as a joining incentive and is not available for purchase.
  • Pick any stamp set of your choice from current catalogs (excluding host sets and Sale-A-Bration sets).
  • FREE shipping on the starter kit.
  • When you join, you will be entitled to a 20% discount on all orders.
  • You do not have to be a business builder!  Happy Discount Shoppers and Hobby Stampers are welcome!
  • There is NO obligation to remain active past July 2020.

Thanks for stopping by today. Stay safe and be well!

 Product List  
Daisy Punch
[143713]
$18.00
Paper Snips
[103579]
$10.00

Merry Merlot Sip Sip Hooray

Today I’m sharing another card I made using the Sip Sip Hooray stamp set and coordinating Sip and Celebrate dies. This one uses the wine glass image so I thought what better colors to use than Merry Merlot and Rococo Rose!

Here is how I made the card.

  • Card base – cut piece of Thick Whisper White cardstock at 4 1/4″ x 11″ and fold in half.
  • Cut piece of Merry Merlot cardstock at 4 1/8″ x 5 3/8″. Use the bubble die in the Sip & Celebrate die set to make the bubble border at the top and bottom of the piece. Adhere to card base.
  • Cut piece of Rococo Rose cardstock at 4 1/8″ x 2 3/4″ and piece of Whisper White cardstock at 4 1/8″ x 2 1/2″.
  • Stamp two of the wine glass images with Memento Tuxedo Black ink on the piece of Whisper White cardstock. Stamp the fill images with Rococo Rose ink.
  • To make the leaves, stamp two images with Mint Macaron ink on scrap piece of Whisper White cardstock and cut out with the coordinating die.
  • Stamp Sip Sip greeting on scrap piece of Whisper White cardstock. Cut circle with one of the smaller dies in the Layering Circles die set. Cut scalloped circle from scrap piece of Merry Merlot and adhere to greeting.
  • Adhere piece with wine glasses to the piece of Rococo Rose and adhere to center of Merry Merlot mat. Adhere leaves to tops of wine glasses. Adhere greeting and embellish it with a Cherry Cobbler rhinestone from the Holiday Rhinestone Basic Jewels pack.
  • For the inside of the card stamp one image of the wine glass and stamp the fill image with Rococo Rose ink. I chose not to stamp a greeting so that I could use the card for any special occasion that pops up where I need to send a card out quickly.

This stamp set and dies will be retiring from the 2019 Holiday Catalog so if you would like to purchase the items individually or as a bundle now is the time, whiles supplies last. Click here to go to my online store.

Thanks for stopping by today!

 Product List  


Gingham Gala Card and Gift Box

Today I”m sharing a card and gift box I created with products from the Gingham Gala Suite pictured on pages 34-35 in the new Occasions catalog.  I love the Gingham Gala Designer Series Papers – the colors are so bright and cheery! For today’s projects I’m working with the Highland Heather paper.

Here is how I made the card.

  • Card base – Thick Whisper White cardstock cut at 4 1/4″ x 11″
  • Cut a piece of Highland Heather cardstock at 4 1/8″ x 5 3/8″ and attach to card base
  • Select one of the butterfly images from the Butterfly Gala stamp set and stamp onto a piece of Whisper White cardstock using black Memento ink.  You will note that each image has both a large and small butterfly on the same stamp.
  • Color butterflies with Stampin’ Blends.  For this card I used the dark and light Highland Heather and Pool Party markers and the light Old Olive marker.  It is very hard to see in the photo but I added clear Wink of Stella to both butterflies.  Stamp the middle part of the butterflies with black Memento ink.  I used the Stamparatus to line up the small stamps.
  • Punch both butterflies out with the Butterfly Duet punch, which includes both the large and small image on the same punch.  Add Mini Stampin’ Dimensionals to the backs of both butterflies
  • Cut a piece of Pool Party cardstock at 2 1/2″ x 3 1/4″.  Cut piece of Highland Heather paper from the Gingham Gala at 2 3/8″ x 3 1/8″ and attach it to the Pool Party cardstock.  Cut a piece of Highland Heather ribbon and tie around piece.  This ribbon is in the Organdy Ribbon Combo Pack in the Sale-A-Bration catalog.
  • Cut a piece of Pool Party cardstock at 2 1/2″ x 3 1/2″.  Cut a piece of Whisper White cardstock at 2 3/8″ x 3 3/8″.   Attach butterflies to Whisper White cardstock.  Stamp the “a little note” greeting in Heather Highland ink.  Attach to Pool Party cardstock.  Add a few of the smallest size of the Gorgeous Grape Glitter Enamel Dots.
  • Attach the gingham piece to the bottom right of the card and then attach the butterfly piece on top of the gingham piece.

  • For the inside of the card I cut a 1/2″ x 5 1/2″ strip of the Highland Heather Gingham Gala paper and attached it to the left side.  I carefully inked up just the small butterfly with black Memento ink and stamped it in the lower right corner.


Here is the coordinating gift box that I created using the Window Box Thinlits on page 232 of the annual catalog.


Here are the steps to make the box.

  • Cut a sheet of Highland Heather cardstock at 8 1/2″ x 11″ in half to give you two pieces at 5 1/2″ x 8 1/2″.  Using the Window Box framelit cut two pieces for the box.  This framelit cuts and scores at the same time.  Put the box together, folding at the score lines and adhering pieces together with either Tombow Multipurpose Glue or Tear & Tape.  Watch this video for complete instructions on how to put the box together.

  • Cut six 1 1/2″ squares of Highland Heather Gingham Gala DSP.  For the top of the box, trace the hexagonal shape of the framelit onto a piece of the DSP and cut out with a scissor.
  • Select one of the butterfly images from the Butterfly Gala stamp set and stamp onto Whisper White cardstock using black Memento ink.  For the box I stamped and colored two large butterflies and one small one.  I chose a different stamp for the box than what I used for the card.
  • Color butterflies with Stampin’ Blends.  I used the dark and light Highland Heather and Pool Party markers and the light Old Olive marker and added clear Wink of Stella.  Stamp the middle part of the butterflies with Black Memento ink, using the Stamparatus to line up the small stamps.
  • Punch the butterflies out with the Butterfly Duet punch.  Add Mini Stampin’ Dimensionals to the backs of the butterflies
  • Stamp a greeting of your choice with Highland Heather ink on a piece of Whisper White cardstock.  I used the “you are amazing” greeting from the Amazing Life stamp set, pictured on page 28 in the Occasions catalog.  Punch out greeting using the Classic Label punch, pictured on page 210 in the annual catalog and add a few Mini Stampin’ Dimensionals on the back.
  •   Adhere gingham pieces to box, adhere the two large butterflies to the top of the box, along with the greeting.  Adhere the small butterfly to the front of the box.

To purchase any of the products used in these projects click here.

Thanks for stopping by today!


Product List

It’s a Beautiful Day

Today I’m featuring the second of four cards we made in my class last week using   the Tropical Escape and Petal Promenade designer series papers.  This card uses one of the beautiful Petal Promenade papers.  I also used the floral die from the  Springtime Impressions Thinlits Dies, which is part of the Garden Impressions Suite.

I cut a piece of Grapefruit Grove cardstock at 4 1/4″ x 11″  for the card base.  Next I cut a piece of the designer paper at 4 1/8″ x 5 3/8″.  I die cut the floral image using a piece of Petal Pink cardstock and attached it to the designer paper using the fine-tip glue pen.  I then attached this to the card base.  Next I stamped the beautiful day greeting from the Love What You Do stamp set with Grapefruit Grove ink onto Whisper White cardstock. I also stamped one of the small floral images from the Happy Birthday Gorgeous stamp set  next to the greeting.

I cut the greeting using one of the circles from the Layering Circles Framelits and then cut a larger circle from the Stitched Shapes Framelits with a piece of the Grapefruit Grove cardstock and attached them together and then attached it to the card.  I added a small Grapefruit Grove faceted dot to the small flower for a little touch of bling.  I cut a 1/2″ x 4″ strip of designer paper and attached it to the bottom of a 4″x 5 1/4″ piece of Whisper White cardstock for the inside of the card.


If you love decorating your home and celebrating Halloween just as I do, you might want to consider subscribing to Paper Pumpkin to get this specially created holiday kit.  Whether you are a new, current or past subscriber, all you need to do is sign up by September 10th. There are no tricks in this kit – just treat packaging!  Mango Melody, Gorgeous Grape, Pumpkin Pie and Basic Black are the featured colors.  Don’t want to make packaging?  The contents of the kit can be repurposed by adding some cardstock to create your own cards or other projects.  A specially designed box will arrive at your doorstep around the 20th of September.  For further information and to subscribe, visit the Paper Pumpkin website and be sure to select me as your demonstrator when completing your subscription order.

Thanks for stopping by today!