Hydrangea Haven-Kylie’s Training Blog Hop

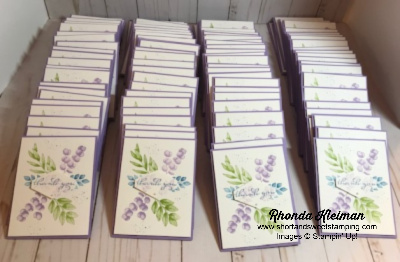
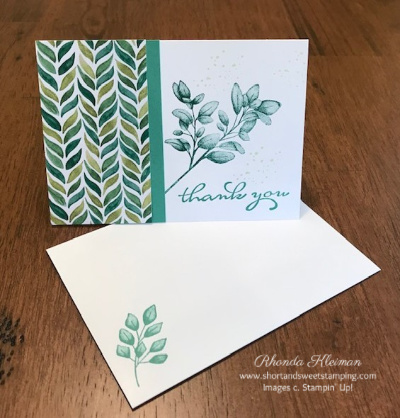
Hello! Welcome to Kylie Bertucci’s Demonstrator Training Blog Hop for January. I’m part of a group of Stampin’ Up! demonstrators from around the world that participate in Kylie’s program for building our businesses. The theme for this year is thank you, to show appreciation to our customers and team. Please be sure to click on the names in the list at the end of this post to hop around and view the beautiful projects posted by so many talented stampers.

Today’s card features the Hydrangea Hill Suite in the new mini catalog. Purple is one of my favorite colors and it isn’t very often that Stampin’ Up! Designer Series Papers showcase the great purples available in the different color families. I also love flowers so this suite was a winning combination for me and was the first one I purchased as soon as the catalog went live!

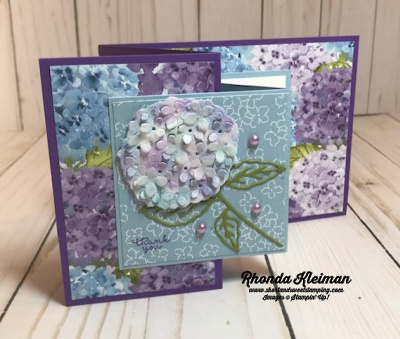
I thought that the Double Z Fold would be a nice way to show off the 3D flower. Here is how I made the card.

  • Card base – Cut a piece of Gorgeous Grape cardstock at 4 1/4″ x 11″. Score at 2 3/4″ and 5 1/2″, fold and sharply crease with a bone folder.
  • Designer Series Paper for card base – cut one piece at 4″ x 5 1/4″ and one piece at 2 1/2″ x 4″ and adhere. I used the paper with the smaller all-over hydrangea design.
  • Smaller card base – cut a piece of Seaside Spray cardstock at 3″ x 9″ and score at 3″ and 6″. Fold and crease sharply with a bone folder.
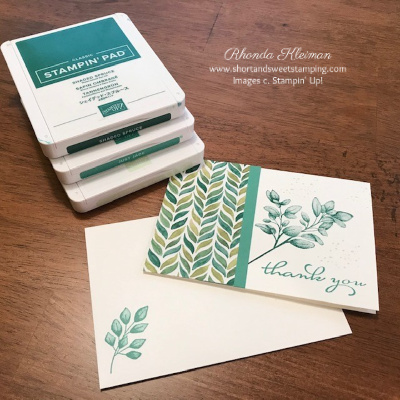
  • Cut piece of the Seaside Spray DSP at 2 7/8″ x 2 7/8″ . Stamp “thank you” from the Hydrangea Haven stamp set with Gorgeous Grape in the bottom left corner.
  • Die cut the leaf and stem piece with Old Olive cardstock using the die from the Hydrangea die set. Cut a piece of an adhesive sheet and adhere to the Old Olive cardstock before running through the die cutting machine. Adhere to Seaside Spray DSP.
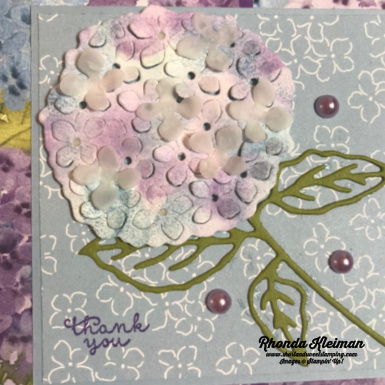
  • To make the 3D flower cut a 2 1/2″ square piece of Basic White cardstock. I used three colors of ink: Highland Heather, Misty Moonlight and Seaside Spray and applied them with a blending brush. I started with the Highland Heather, randomly dabbing the color on, making small circles, working from the center and going out to make a large circle. I repeated this step with the Seaside Spray and then filled in with accents of Highland Heather. I did first and second generation inking to produce the shading. I have a set of blender brushes in different sizes that I purchased at a scrapbooking show several years ago and I used one of the smaller brushes since I was working with a small piece. I don’t have our new brushes yet so I’m not sure how well this technique will work with the size of the SU brush. You can also use sponge daubers, which would work nicely for this technique.
  • Once the inking is done run it through your die cutting machine using the solid flower die. To get the raised effect turn the piece to the back and use either the paper piercer end of the Take Your Pick tool or the point of the paper snips to poke the flowers out to the front. To fill the flower out more, cut a strip of Vellum Paper and use the long die with the blossoms to cut them out. Curl them with your fingertip, place a small drop of liquid glue in the center and randomly adhere to the flower. I used five of the blossoms.
  • Adhere piece to the Seaside Spray DSP piece with Stampin’ Dimensionals. Add three of the Highland Heather Pastel Pearls. Adhere the DSP piece to the front of the smaller card base.
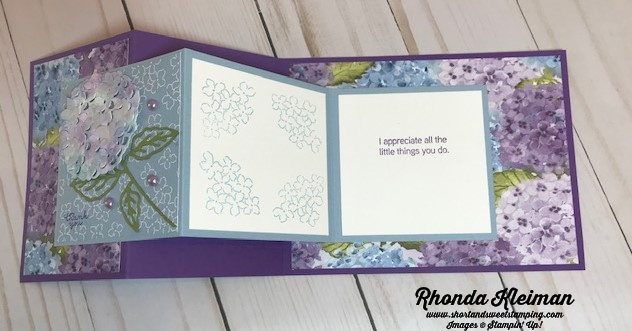
  • For the inside of the smaller card base cut two pieces of Basic White cardstock at 2 3/4″ square. Stamp a greeting with Gorgeous Grape ink on one piece and adhere to inside of the card base. Stamp the smaller petal image with Seaside Spray ink in each of the four corners of the other piece and adhere to the middle section of the card base. Adhere smaller card base to the larger card base. When adhering the front make sure to only apply the adhesive to the left half of the piece in order for the card to open.

Thanks for stopping by today!

Forever Fern-Kylie’s International Blog Highlights

Hello! Today I’m participating in Kylie Bertucci’s International Blog Highlights. Readers get to vote on their top five favorites in the gallery and the top 10 winners will get to participate in an International Blog Hop later this month. The thank you theme is a way for us to show our appreciation to someone that has inspired, helped or supported us in some way. Today’s card features Forever Fern, one of my favorite stamp sets from the annual catalog.

I was asked by a women’s organization I belong to, to make cards to go into 110 goodie bags that were hand-delivered to our members two weeks ago. Normally we have an annual membership dinner at a restaurant, however, due to Covid, we were unable to meet in person. We hosted a Zoom event and everyone opened up their bags at the same time. While we couldn’t be together in person, this was the next best option and it was a fun evening! Since I had to do so many cards I stuck to stamps, ink, paper and threw in a punch. Highland Heather and Pacific Point matched our logo perfectly and I added in Granny Apple Green.

Here is how I made the card.

  • Card base – cut Highland Heather cardstock at 4 1/4″ x 11″, score at 5 1/2″ and crease with a bone folder.
  • Cut piece of Whisper White cardstock at 4″ x 5 1/4″. Stamp the floral images from the Forever Fern stamp set with Highland Heather, Pacific Point and Granny Apple Green ink. Since I had to make multiple cards, I used the Stamparatus, which was a great time saver! Stamp the splatter image around the leaves with Pacific Point ink, stamping off once before stamping onto the cardstock.
  • On a scrap piece of Whisper White cardstock, stamp the thank you greeting from the Borders Abound stamp set. Punch out with the Tailored Tag punch. Overstamp the small leaf image twice with Highland Heather ink, first stamping off each time. I added a small pearl at the bottom of the tag.
  • Adhere the stamped floral piece to the card base with Stampin’ Dimensionals and then adhere the tag to the center of the floral spray with Mini Stampin’ Dimensionals.

We wanted to put a special message into the card so I ended up creating the inside of the card by using my computer printer. I selected a font that came close to matching the font on the tag and then used the RGB numbers for Pacific Point to print the messages, which I did four to a page and then cut apart with the Stampin’ Trimmer.

I’d be so appreciative if you would vote for my card by clicking on the vote image below. To give a vote, once you are in the gallery, click on the heart at the top right hand side of the picture as the hearts appear.

Thanks for stopping by today!

 Product List  
Stamparatus
[146276]
$49.00
November 5-7

Forever Fern Note Cards

Hello! Today I’m sharing with you my June customer thank you cards that feature products from the Forever Greenery Suite. I’ve written before that I often neglect to use Stampin’ Up’s note cards, especially when I only need to write a few lines so this time I remembered! The note cards come with envelopes, 20 of each, and at $7.00 for the package, this is a great deal!

Here is how I made the cards:

  • I used the Whisper White note cards. Fold note cards on score line.
  • Cut piece of Forever Greenery Designer Series Paper at 2″ x 3 1/2″.
  • Cut strip of Just Jade cardstock at 1″ x 3 1/2″.
  • Stamp large leaf image from the Forever Fern stamp set with Shaded Spruce ink. Stamp greeting from the Borders Abound stamp set with Just Jade ink. I used the Stamparatus, which is a great tool for making multiples of the same card.
  • Stamp the speckle image from the Forever Fern stamp set with Soft Sea Foam ink around the leaf image.
  • Adhere cut Just Jade strip to card front, close to left edge of the leaf image. Adhere DSP over the Just Jade strip so that 1/4″ of the Just Jade shows as a thin strip.
  • I left the inside blank so I would have enough room to write my note but you can certainly add a thin strip of DSP or stamp a small image if you choose to decorate it.
  • Stamp one of the smaller leaf images with Shaded Spruce ink in the bottom left corner of the envelope

This was a quick and easy project!

Bonus Days are back once again! From July 1 through August 3rd, for every $50 you spend (before shipping & tax) you will receive a $5 Bonus Day coupon code that can be used from August 4th – 31st.

  • You must have an email address in order to participate because the codes can only be delivered electronically.
  • If you earn multiple coupons in a single order, all of the codes will be sent in one email. If you earn multiple coupons for multiple orders they will be sent in separate emails for each code earned.
  • There is no limit on the number of coupon codes you can earn during this promotion.

Thanks for stopping by today!

 Product List  
Stamparatus
[146276]
$49.00

Butterfly Beauty-Kylie’s International Blog Highlights

Hello! Today I’m participating in Kylie Bertucci’s International Blog Highlights. Readers get to vote on their top five favorites in the gallery and the top 10 winners will get to participate in an International Blog Hop later this month. The thank you theme is a way for us to show our appreciation to someone that has inspired, helped or supported us in some way. When I saw the Rainbow Glimmer Paper in the new annual catalog I immediately thought that it would work beautifully with the Butterfly Beauty dies and it did not disappoint! I combined it with the Artistry Blooms Designer Series Paper, which I knew I had to have the minute I laid eyes on it!

Here is how I made the card.

  • Card base – cut a piece of Mango Melody cardstock at 4 1/4″ x 11″, score at 5 1/2″ and fold in half.
  • Cut piece of Artistry Blooms DSP at 4 1/8″ x 5 3/8″ and adhere to card base. I knew I wanted to work with the orange & pink color palette so I cut the strip of DSP at the full 12″ length and then cut the piece down to show the portion of the strip that had the most Mango Melody in the gradation.
  • Cut strip of Rainbow Glimmer Paper at 4 1/2″ x 12″ and again, decide what gradation you want to use and make the final cut at 4 1’2″ x 6″. Run piece through a die cutting machine with one of the two large Butterfly Beauty dies. I chose the one that had the solid outside wings. Adhere to DSP.
  • Stamp hello greeting from the Beauty Abounds stamp set with Tuxedo Black Memento black ink on scrap of Daffodil Delight cardstock. Cut out with the small circle die from the Tasteful Touches die set.
  • Cut two pieces of Daffodil Delight Ruched ribbon, trim ends and adhere, criss-cross to butterfly. I found that either the Tear & Tape or Stampin’ Seal+ worked best when adhering to the glimmer paper surface. Adhere stamped greeting over the center of the ribbon.
  • Adhere Champagne Rhinestones on the butterfly for some extra bling.
  • For the inside of the card, cut a piece of Whisper White cardstock at 4″ x 5 1/4″. Stamp greeting from Butterfly Gala stamp set with Magenta Madness ink. Stamp butterfly from Beauty Abounds stamp set with Mango Melody ink. Adhere to card.

I had so much fun making this card and it turned out exactly as I had pictured it. I’d be so appreciative if you would vote for my card by clicking on the vote image below. To give a vote, once you are in the gallery, click on the heart at the top right hand side of the picture as the hearts appear.

Thanks for stopping by today!

Bonus Days are back once again! From July 1 through August 3rd, for every $50 you spend (before shipping & tax) you will receive a $5 Bonus Day coupon code that can be used from August 4th – 31st.

  • You must have an email address in order to participate because the codes can only be delivered electronically.
  • If you earn multiple coupons in a single order, all of the codes will be sent in one email. If you earn multiple coupons for multiple orders they will be sent in separate emails for each code earned.
  • There is no limit on the number of coupon codes you can earn during this promotion.
 Product List  
Paper Snips
[103579]
$10.00

Botanical Prints-Kylie’s Training Blog Hop

Hello! Welcome to Kylie Bertucci’s Demonstrator Training Blog Hop for May. I’m part of a group of Stampin’ Up! demonstrators from around the world that participate in Kylie’s program for building our businesses. Please be sure to click on the names in the list at the end of this post to hop around and view the beautiful cards posted by so many talented stampers.

Today’s card features the Botanical Prints Product Medley in the 2020 Mini Catalog. I fell in love with this medley as soon as I saw it in the catalog, ordered it right away and then it sat, untouched until I finally pulled it out over the weekend. I don’t know how I neglected this – obviously got sidetracked somewhere along the way! I made a bunch of these cards to thank customers for their April orders. This lovely set will be retiring on June 2nd and I will be sad to see it go. I used the same layout as the Free as a Bird card I posted last week for Kylie’s International Blog Highlights, as it is a great way to showcase our designer series papers.

Here is how I made the card.

  • Card base – cut piece of Thick Whisper White cardstock at 4 1/4″ x 11″, score at 5 1/2″ and fold in half.
  • Cut piece of Whisper White cardstock at 4″ x 5 1/4″. This will be used as the base to attach the DSP and ribbon.
  • Cut one piece of DSP at 2″ x 5 1/4″ and two contrasting pieces of DSP at 2″ x 2/12″ and 2″ x 2 3/4″ and adhere to card.
  • Cut piece of ribbon at 6″ and adhere to card, covering center seam of the DSP, folding both ends of the ribbon to the back of the card. I used a small piece of tape to hold them in place. Adhere this base to the card base.
  • Stamp floral image on scrap piece of Whisper White cardstock. Stamp greeting with Tuxdeo Black Memento Ink, using the Stamparatus to position it so it is centered properly.
  • Cut oval with the die from Layering Ovals set. Cut piece of Terracotta Tile cardstock with a scalloped die from the Layering Ovals set.
  • Color the image with Stampin’ Blends. I used Old Olive light and dark for the leaves, Cajun Craze light and dark, Pumpkin Pie light for the flowers. Adhere image to the Terracotta Tile oval piece.
  • Adhere oval to center of card. Use several Mini Glue Dots to adhere dragonfly to image.

Thanks for stopping by today!


 Product List  
Stamparatus
[146276]
$49.00
Paper Snips
[103579]
$10.00

Free as a Bird

Today I’m participating in Kylie Bertucci’s International Blog Highlights. Readers get to vote on their top five favorites in the gallery and the top 10 ten winners will get to participate in an International Blog Hop later this month. The theme is thanks and I hope you like my card.

I haven’t used the Free as a Bird stamp set in quite some time so I decided to use it to make a few cards to send to some of the caregivers at the personal care facility where my father lives as a small way to show my appreciation as they show up to work every day to care for the elderly under such stressful circumstances. I wanted the card to be bright and cheery and this little bird fills the bill!

Here is how I made the card.

  • Card base – cut piece of Pool Party cardstock at 5 1/2″ x 8 1/2″, score at 4 1/4″ and fold in half..
  • Cut a 2″ strip of paper from the Bird Ballad Designer Series Paper. I chose the one with the feathers on one side and the bird cage on the reverse side. From that strip cut pieces at 5 1/4″, 2 3/8″ and 2 3/4″ and adhere to card.
  • Stamp bird image with Tuxedo Black Memento Ink on scrap piece of Whisper White cardstock. Color beak with dark Daffodil Delight Stampin’ Blend, body of bird with light Calypso Coral Stampin’ Blend and feathers with dark and light Smoky Slate Stampin’ Blends.
  • Stamp leaf image. Color branch with dark Soft Suede Stampin’ Blend and leaves with light Old Olive Stampin’ Blend.
  • Stamp thank you with the Memento Ink from the Very Versailles stamp set.
  • Cut stamped image with die from the Layering Circles die set. Cut scallop circle from piece of Pool Party cardstock. Adhere two pieces together.
  • Stamp small flower image from the Free as a Bird stamp set on small scrap piece of Whisper White cardstock, color with dark Daffodil Delight Stampin’ Blend, fussy cut and adhere to bird image with liquid adhesive.

Please vote for my card by clicking here: http://bit.ly/KyliesInternationalHighlightsMay2020VoteForMeHere. To give a vote click on the heart in the top right hand side of the picture when the hearts appear.

Thanks for stopping by today!

 Product List  
Paper Snips
[103579]
$10.00

Garden Impressions Tea Together

Hello! This is the last day of Stampin’ Up’s annual Sale-A-Bration promotion so there only a few hours left to place your last minute orders! Today I have two cards for you that feature the Tea Together stamp set on page 49 of the Occasions catalog and the Tea Time Framelits Dies, one of the Sale-A-Bration items you can get with a $100 purchase. It is very rare for Sale-A-Bration items to carry over into an upcoming annual catalog, so I’m happy to let you know that these dies will be available again beginning with the new catalog release on June 4th, 2019. The teapots in both cards are made using some of the beautiful papers from the Garden Impressions Designer Series Paper shown on page 130 in the catalog.

  • Card base – cut a piece of Soft Sea Foam cardstock at 4 1/4″ x 11″ and fold in half.
  • Run piece of 4″ x 5 1/4″ Whisper White cardstock through the Big Shot with the Garden Trellis Embossing Folder and adhere to front of card base.
  • Stamp teapot and cup and saucer images on sheet of Designer Series Paper using Memento Tuxedo Black ink and run through Big Shot using coordinating framelits dies. Adhere to card.
  • Stamp large rose and two small flower images on piece of Whisper White cardstock with Memento ink. Color flowers using these Stampin’ Blends: large rose – light & dark Calypso Coral, dark Flirty Flamingo, small flowers – dark Daffodil Delight for flower centers, light & dark Calypso Coral, leaves – light Shaded Spruce. Run through Big Shot with coordinating dies. Adhere to teapot and tea cup.
  • For the greeting I stamped “thanks” from the Beauty Abounds stamp set onto a small piece of Soft Sea Foam with Memento ink , however you can choose any greeting from your collection of stamp sets. I die cut the greeting with one of the labels from the Stitched Labels Framelits Dies and adhered it to the upper left corner of the card.
  • Card base – cut a piece of Night of Navy cardstock at 4 1/4″ x 11″ and fold in half.
  • Stamp teapot image on sheet of Designer Series Paper using Memento Tuxedo Black ink and run through Big Shot using coordinating framelits die. Adhere to card.
  • Stamp one of the small butterfly images from the Butterfly Gala stamp set with Memento ink onto small piece of Whisper White cardstock and color with dark Daffodil Delight Stampin’ Blend marker. Punch out with the Butterfly Duet Punch. Good news – this punch was put on “not orderable” status for six weeks and is now available again!
  • Stamp “thank you” greeting from the Climbing Roses stamp set on small piece of Whisper White cardstock with Night of Navy ink. Punch out with the Pretty Label punch. Adhere to bottom of teapot and then adhere butterfly to teapot with Mini Stampin’ Dimensionals .
  • Run piece of 4″ x 5 1/4″ Mango Melody cardstock through the Big Shot with the Garden Trellis Embossing Folder. Cut piece of 1/2″ Night of Navy gingham ribbon and tie around embossed piece. Adhere to front of card base.

To order any of the supplies I used to make these cards click here to shop my online store or feel free to contact me directly. Thanks for stopping by today!

 Product List