Happy Galentine’s Day!

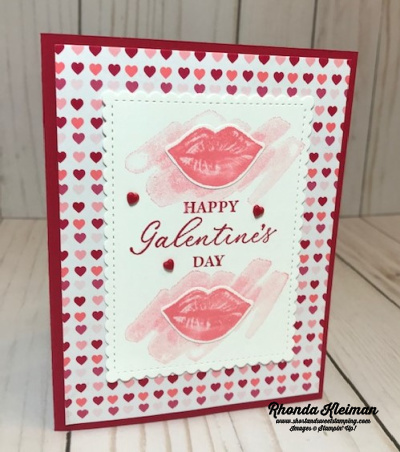
Hello! Today’s cards feature the Hearts & Kisses Bundle. When I saw this bundle in the mini catalog, as a woman that loves lipstick and feels naked when I’m not wearing it, I knew I had to purchase it! I also thought that it would make great cards to send to my gal pals to celebrate Galentine’s Day! As I’m writing this post, I’ve already heard back from a few of them to say how much they loved receiving their cards! One of my friends has a Valentine’s Day birthday and another has a birthday on February 17 so I used a birthday greeting for those two cards.
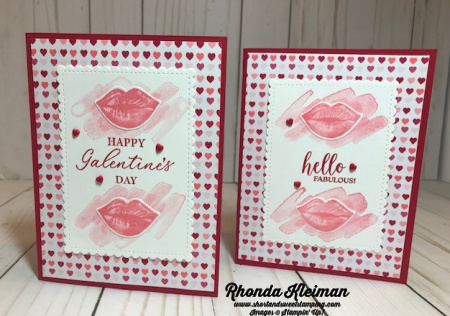
Here is how I made the cards.

  • Card base – cut a piece of Real Red cardstock at 5 1/2″ x 8 1/2″, score at 4 1/4″, fold and crease with a bone folder.
  • Cut piece of DSP at 4″ x 5 1/4″. I used From My Heart Specialty DSP from the 2020 Spring Mini Catalog, now retired. Adhere to card front.
  • Cut a piece of Basic White cardstock at 3 1/4″ x 4 1/2″ and run through your die cutting machine with the largest rectangle from the Stitched So Sweetly dies.
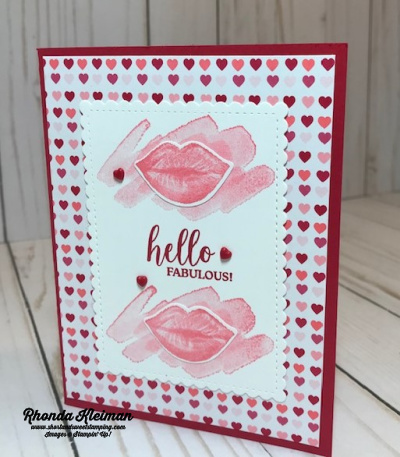
  • Stamp the lipstick streak image from the Hearts & Kisses stamp set with Flirty Flamingo ink at the top and bottom of the die cut piece, stamping off first, before stamping onto the cardstock. For the birthday card I stamped the Galentine’s Day greeting with Real Red ink in between the stamped streaks. For the Galentine’s Day card I used the Hello Fabulous greeting from the Dressed to Impress stamp set.
  • Stamp two lips with Flirty Flamingo ink, punch out with the Kiss Punch and adhere on top of the streaks. Embellish with three Resin Hearts. Adhere piece to card front.
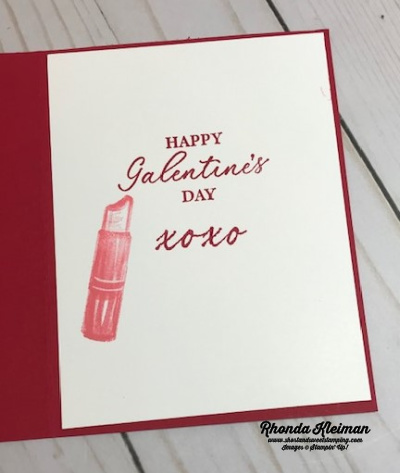
  • For the inside of the card, cut a piece of Basic White cardstock at 4″ x 5 1/4″. For the birthday card I stamped it with the Happy Birthday greeting from the Happy Thoughts stamp set and I used the Happy Galentine’s Day greeting for the rest of the cards. I stamped the greetings and the xoxo with Real Red ink. Stamp the lipstick with Flirty Flamingo ink. Adhere to inside.

Thanks for stopping by today!

Sale-A- Bration is a great time to consider joining Stampin’ Up! During this promotion you can purchase the starter kit for only $99 and select $125 worth of merchandise from the current annual catalog or the new mini catalog. This is the BEST deal! You will also get a FREE 200 6″ x 6″ sheet assortment of our newest Designer Series Papers for five current color families, a $57.50 value! This paper will not be available for purchase until May 2021. Free shipping is also included. Become a happy shopper and enjoy a 20% discount on future orders. Click here to join.

Product List
Kiss Punch
[154238]
$18.00
Paper Snips
[103579]
$10.00

True Love Valentine’s Day Card

Hello! Today I’m sharing another Valentine’s Day card that was one of the projects in my January class to go. It features the True Love Designer Series Paper.

Here is how I made the card.

  • Card base – cut a piece of Real Red cardstock at 5 1/2″ x 8 1/2″, score at 4 1/4″, fold and crease with a bone folder.
  • Cut piece of the True Love DSP with the stripes at 4″ x 5 1/4″ and adhere to card front.
  • Cut piece of Basic Black cardstock at 3 1/2″ x 4 1/2″. Run through your die cutting machine with the largest rectangle die from the Stitched So Sweetly die set.
  • Cut piece of Basic White cardstock at 2 1/4″ x 2 1/2″. Cut a piece of an Adhesive Sheet the same size and adhere to cardstock. Using the “Love” die from the Always Dies, run through your die cutting machine. Adhere to bottom of the Basic Black rectangle.
  • Select one of the double flowers from a sheet of the True Love DSP. Color the flowers with Real Red light and dark Stampin’ Blends. Color leaves with Mossy Meadow light and dark Stampin’ Blends. Fussy cut and adhere to Basic Black rectangle. Adhere several white Resin Hearts from the Snail Mail suite. Adhere Basic Black piece to card front with Stampin’ Dimensionals.
  • Cut a piece of Basic White cardstock at 4″ x 5 1/4″. Stamp greeting with Real Red ink. You can use any of the greetings from the stamp sets in the Love You Always. I used the “Happy Heart Day” greeting from the Arrange a Wreath stamp set. Adhere to inside of card.

Thanks for stopping by today!

Sale-A- Bration is a great time to consider joining Stampin’ Up! During this promotion you can purchase the starter kit for only $99 and select $125 worth of merchandise from the current annual catalog or the new mini catalog. This is the BEST deal! You will also get a FREE 200 6″ x 6″ sheet assortment of our newest Designer Series Papers for five current color families, a $57.50 value! This paper will not be available for purchase until May 2021. Free shipping is also included. Become a happy shopper and enjoy a 20% discount on future orders. Click here to join.

Product List
Always Dies
[154307]
$33.00
Paper Snips
[103579]
$10.00


Flower & Field-Kylie’s Training Blog Hop

Hello! Welcome to Kylie Bertucci’s Demonstrator Training Blog Hop for February. I’m part of a group of Stampin’ Up! demonstrators from around the world that participate in Kylie’s program for building our businesses. The theme for this year is thank you cards that we make as a way to show appreciation to our customers. Please be sure to click on the names in the list at the end of this post to hop around and view the beautiful projects posted by so many talented stampers.

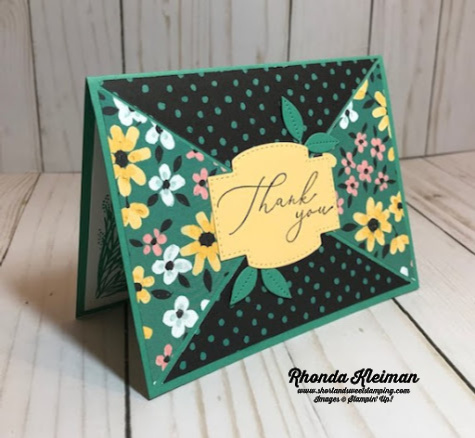
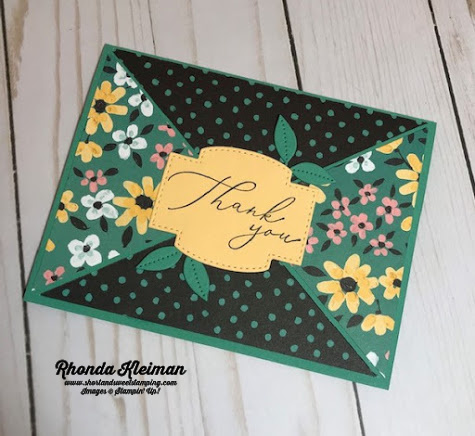
Today’s card showcases the pretty Flower & Field Designer Series Paper, one of the Sale-A-Bration items you can earn for free with a $50 order. This is an easy layout that makes DSP the star of the show.

Here is how I made the card.

  • Card base – cut a piece of Just Jade cardstock at 5 1/2″ x 8 1/2″, fold in half and crease with a bone folder.
  • Cut a piece of Flower & Field DSP at 4″ x 5 1/4″. Cut in half on the diagonal by lining up opposite corners along the cutting track of the paper trimmer. Once you make the cut, without pulling the two pieces apart, gently turn the piece around so that you are now cutting the two other opposite corners. You have now cut out an “X” and can pull the triangles apart.
  • For this card I decided to use both sides of the DSP, however, you can mix and match with other contrasting pieces of DSP. You would just cut another piece of DSP at 4″ x 5 1/4″ and repeat the cutting process for making the “X.”
  • Adhere one set of triangles , matching the points in the center of the card front. Adhere the second set of triangles and space them so that some of the card base shows in between.
  • Stamp greeting from the Heal Your Heart stamp set, another Sale-A-Bration item, with Tuxedo Black Memento Ink on scrap piece of So Saffron cardstock. Run through your die cutting & embossing machine with one of the labels from the Stitched So Sweetly Dies.
  • Die cut two sets of the smallest set of leaves from the Pierced Blooms Dies, a fabulous set of dies in the January-June 2021 Mini Catalog. Adhere the leaves to opposite sides of the label with glue dots. Adhere label to center of card front.
  • Cut a piece of Basic White cardstock at 4″ x 5 1/4″. Stamp the smaller image from the Corner Bouquet stamp set with Just Jade ink in the lower left corner and adhere to inside of card. I chose not to stamp a greeting in order to write a personalized note.

Thanks for stopping by today!

Product List

The Bouquet of Hope Paper Pumpkin Kit provides enough supplies to create nine cards and coordinating envelopes. This soft, sympathetic kit includes patterned card bases, die-cut floral elements, ribbon, embellishments, and more! The kit’s exclusive Bouquet of Hope Stamp Set features supportive sentiments centered around comfort, care, hope, and love. Such a versatile stamp set can be used throughout the year! To subscribe to Paper Pumpkin, visit my site by clicking here.

Always Valentine’s Day Card

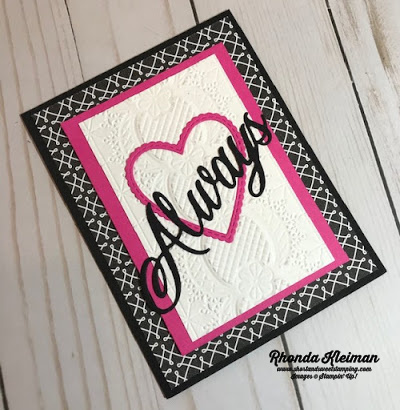
Hello! Today I’m featuring a Valentine’s Day card that we did in my January class to go. It uses dies and an embossing folder and the only stamping is the greeting on the inside of the card. I’ve been seeing cards with a Basic Black, Basic White and Magenta Madness color combination that I think is very striking so here is what I came up with.

Here is how I made the card.

  • Cut piece of Basic Black cardstock at 4 1/2″ x 11″, score at 5 ½”, fold and crease with bone folder.  Cut piece of True Love Designer Series Paper at 4″ x 5 1/4″ and adhere to card front.
  • Cut piece of Basic White cardstock at 2 3/4″ x 4 1/4″. Run it through your die cutting and embossing machine with the Lace 3D embossing folder, centering the design so that it is even on both sides.  Adhere to a piece of Magenta Madness cardstock cut at 3 1/4″ x 4 1/2″.
  • Back a scrap piece of Basic Black cardstock with part of an adhesive sheet that is cut to size and run through your die cutting & embossing machine with the Always die from the Always Die set.  Cut a 2 1/2″ square piece of Magenta Madness cardstock and back with a piece of adhesive sheet. Run it through the machine with the second largest scalloped heart from the Stitched Be Mine die set.  Adhere the heart to the embossed Basic White piece.  Adhere to the Magenta Madness cardstock.  Adhere the Always die cut to the piece and then adhere piece to card front with Stampin’ Dimensionals.
  • You can use any greeting from your stamp sets for the inside greeting. I mixed sentiments from two different stamp sets. I used “In My Heart” from the Field of Flowers stamp set and the “Happy Valentine’s Day” greeting from the Forever Lovely stamp set, which is now retired. I lined both of them up on an acrylic block so I could stamp them both at the same time and stamped them with Magenta Madness ink on a piece of Basic White cardstock cut at 4″ x 5 1/4″. Adhere to inside of card.

Thanks for stopping by today!

Hey Chick and Hey Birthday Chick Bundles Now Available!

The Hey Birthday Chick bundle on page 52 in the Mini catalog probably reminded some of you of the Hey Chick stamp set that was a well-loved SAB item in 2017.  Stampin’ Up! decided to bring it back and has added a coordinating die set and a new bundle created in the same style. These products are now available through June 30th. For further information and to place an order in my online store click here

Product List
Always Dies
[154307]
$33.00
Paper Snips
[103579]
$10.00

Fine Art Floral Happy Birthday

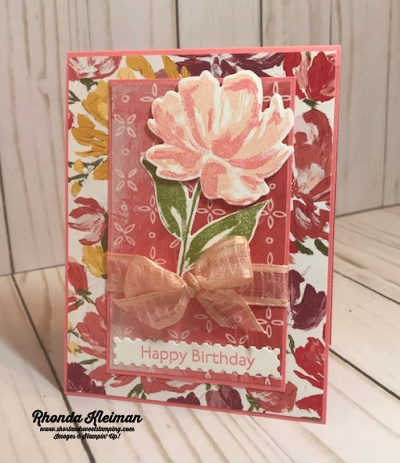
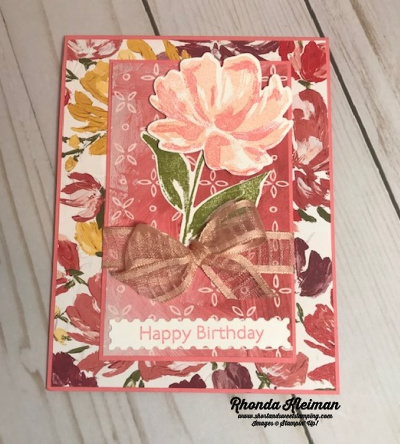
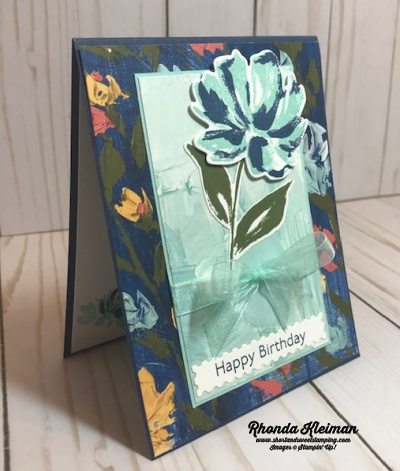
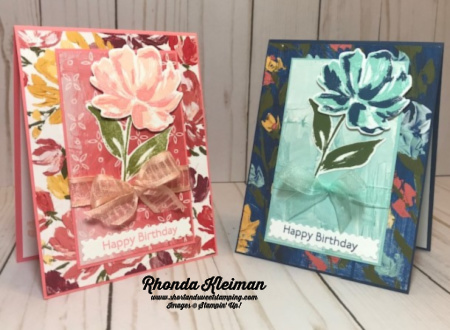
Hello! Today I have two birthday cards for you that feature the Fine Art Floral Suite. I used the same layout for both but changed up the colors. I used the pink tones for one and the blue tones for the other.

Here is how I made the card.

  • Card base – cut piece of Flirty Flamingo cardstock at 4 1/4″ x 11″, score at 5 1/2″, fold and crease with a bone folder.
  • Cut piece of Fine Art Floral Designer Series Paper at 4 1/8″ x 5 3/8″ and adhere to front of card. Cut another piece of Flirty Flamingo cardstock at 2 7/8″ x 4 5/8″. Cut a contrasting piece of Fine Art Floral DSP at 2 3/4″ x 4 1/2″ and adhere to Flirty Flamingo piece.
  • Use the Art Gallery stamp set and stamp the flower with Petal Pink and Flirty Flamingo ink. Stamp the leaves with Old Olive ink. Cut out with coordinating dies from the Floral Gallery Dies set. Stamp birthday greeting with Flirty Flamingo ink on scrap piece of Basic White cardstock. Cut out with one of the labels in the dies set.
  • Adhere greeting at bottom of the smaller card front. Arrange leaves and flower. Adhere leaves and then adhere flower with Stampin’ Dimensionals.
  • Cut a length of Organdy Striped Ribbon and tie in bow around the piece. Adhere piece to card front.

Follow the above steps to make the blue version of the card.

  • Card base – Night of Navy cardstock, Pool Party cardstock for smaller card base
  • DSP – select papers from the blue family in the set
  • Ink – Mossy Meadow for the leaves, Night of Navy and Pool Party for the flower. Night of Navy for the birthday greeting.
  • Ribbon – Pool Party Sheer Ribbon

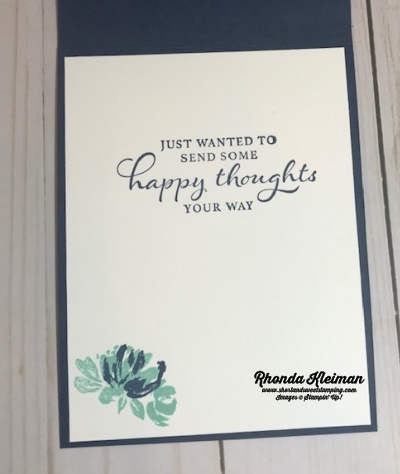
For the inside of both cards:

  • Cut piece of Basic White cardstock at 4″ x 5 1/4″.
  • Stamp sentiment from the Happy Thoughts stamp set with Night of Navy /Flirty Flamingo ink.
  • Stamp small flower in lower left corner with either the Night of Navy/Pool Party combination or the Flirty Flamingo/Petal Pink combination of inks. Adhere to inside of card.

Which one do you like better – the pink or the blue? Please feel free to leave me a comment!

Thanks for stopping by today!

The Bouquet of Hope Paper Pumpkin Kit provides enough supplies to create nine cards and coordinating envelopes. This soft, sympathetic kit includes patterned card bases, die-cut floral elements, ribbon, embellishments, and more! The kit’s exclusive Bouquet of Hope Stamp Set features supportive sentiments centered around comfort, care, hope, and love. Such a versatile stamp set can be used throughout the year! To subscribe to Paper Pumpkin, visit my site by clicking here.

Product List
Paper Snips
[103579]
$10.00

Handsomely Suited Birthday Card

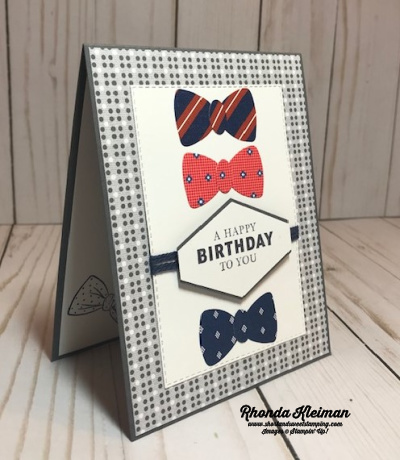
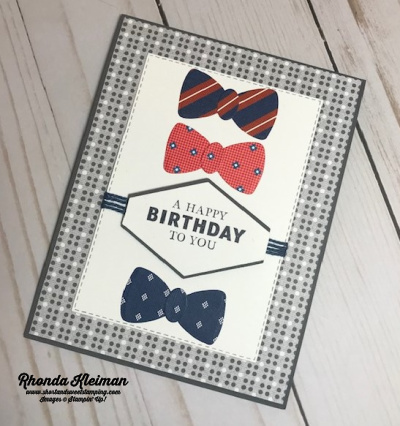
Hello! Today I’m sharing a fun card I made with products from the new Well Suited Suite. This is a great suite for making masculine cards for many occasions. The Handsomely Suited stamp set has a nice variety of greetings and type fonts and the Designer Series Paper is fabulous! The fabric designs for the men’s suits, shirts and ties are so realistic. I made this card for my father, who will be celebrating his 99th birthday this Saturday – it is hard to believe!!

Here is how I made the card.

  • Card base – cut a piece of Basic Gray cardstock at 4 1/4″ x 11″, score at 5 1/2″, fold and crease with a bone folder.
  • Cut a piece of Well Suited DSP at 4 1/8″ x 5 3/8″ and adhere to card front.
  • Cut a piece of Basic White cardstock at 3 1/2″ x 4 1/2″ and using the third largest rectangle from the Stitched Rectangles dies, run it through your embossing machine.
  • Select three different pieces of DSP and from each, die cut the bow ties with the large bow tie and small knot dies from the Suit & Ties Dies. Adhere the knots to the bow ties. Adhere two of them to the top part of the rectangle. Adhere one to the bottom of the rectangle, leaving space in between for the greeting.
  • Stamp greeting on scrap piece of Basic White cardstock with Basic Gray ink. Punch out with the Tailored Tag punch. This is one of my all-time favorite Stampin’ Up! punches! To add a touch of contrast, punch another tag from a scrap piece of Basic Gray cardstock. Cut in half horizontally. Adhere one half to the top of the tag and the other half to the bottom of the tag, leaving just a little bit of the gray showing.
  • Wrap a piece of Night of Navy Twine around the blank section between the bow ties four times. Start wrapping from the back of the piece, taping the tail down with Scotch Tape or Tear and Tape. After the fourth wrap, cut twine from the spool and tape again.
  • Adhere piece to card front. Adhere the greeting over the twine with Stampin’ Dimensionals.
  • Cut a piece of Basic White cardstock at 4″ x 5 1/4″ and stamp a greeting with Basic Gray ink. Stamp a bow tie with Night of Navy ink in bottom left corner. Adhere to inside of card.

Thanks for stopping by today!

Product List
Paper Snips
[103579]
$10.00

Sneak Peek – Fine Art Floral Suite

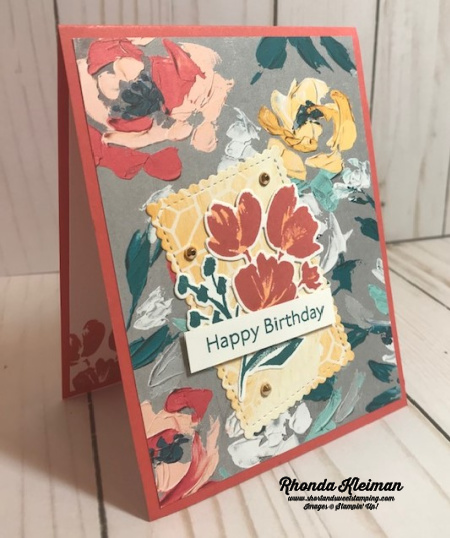
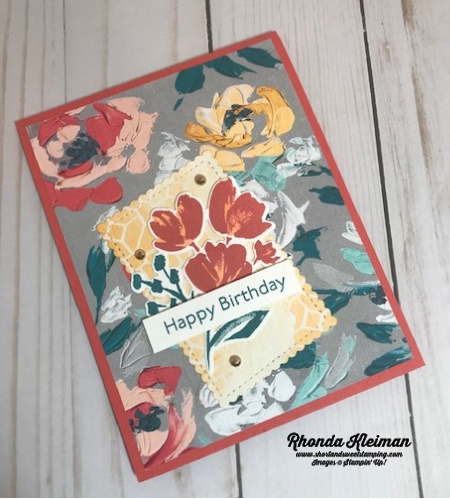
Hello! All of my holiday stamps and papers have been put away and it is now time to break out some new products from the January-June 2021 Mini Catalog that will go live on January 5th! Today I have a card that features some of the products from the Fine Art Floral Suite. The Designer Series Papers are gorgeous. They were hand painted by Stampin’ Up! artists and were then photographed and turned into the DSP.

Here is how I made the card.

  • Card base – cut a piece of Terracotta Tile cardstock at 4 1/4″ x 11″, score at 5 1/2″, fold and crease with a bone folder.
  • Cut piece of the Fine Art Floral Designer Series Paper at 4″ x 5 1/4″ and adhere to card front.
  • Cut a contrasting piece of DSP at 2 1/2″ x 3 1/2″ and run through your die cutting machine with the third largest scalloped rectangle die from the Stitched So Sweetly die set. Adhere to card front, off center and at an angle.
  • For the stamped image use the the floral spray in the Art Gallery stamp set. In order to use more than one ink color on the image you will have to stamp it multiple times. This is a photopolymer stamp, which is hard to color on with markers the way you do with a rubber stamp. First stamp the image with Pretty Peacock ink on a scrap piece of Whisper White cardstock and then stamp the same image on a other scrap piece of cardstock with Terracotta Tile ink. For added contrast color in the white spaces with the light Pumpkin Pie Stampin’ Blend.
  • Run both stamped images through your die cutting machine with the coordinating die from the Floral Gallery Dies. Trim off the leaves from the Terracotta Tile stamped image and adhere the flower part over the flowers on the Pretty Peacock stamped image. Adhere to the die cut scalloped piece on the card front.
  • Stamp greeting with Pretty Peacock ink on 1/2″ wide scrap piece of Whisper White cardstock and trim ends with paper snips. Adhere on top of the floral image with Stampin’ Dimensionals.
  • For extra bling add three small Gilded Gems around the flower.
  • For the inside of the card cut a piece of Whisper White cardstock at 4″ x 5 1/4″. Stamp another greeting in Pretty Peacock ink. I used “Best Wishes.” Ink up the top part of the floral image stamp with Terracotta Tile ink and stamp in bottom left corner . Adhere to the inside.

There are just a few days left for you to order retiring products from the August-December 2020 Mini Catalog! Products available while supplies last!

Thanks for stopping by today!

 Product List  
Paper Snips
[103579]
$10.00